We tend to what seems like eat way more in the summer months!
Maybe it seems like it, maybe because I don’t want to cook, when it’s so nice out.
Who want to do the same thing everyday like cook supper when you can be out playing in the sun.
This is a reason why I love freezer meals, but if freezer meals is not your jive, or you don’t have any on hand.
Have no fear mama Kandis is here lol.
Hi I’m Kandis a stay at home mom and wife. I have 4 children ages from 12 down to 2 years! I tell you food can go fast here, I’m always thinking on what’s the next thing to make! What to do for supper again tonight Lol!🤣
So let’s talk burgers, easy, fast and will save you money!
Sounds magical to me lol, so let’s start!
There is always those go to summer meals. Those foods that seem ok to constantly eat over and over in the summer.
In this house one of our staple go to foods is good old burgers!
What is your staple summer foods, something that no matter what the family will eat and usually enjoy!
With burgers it’s just easy right!
Make a salad, or some fries or just have the burgers! Grill them, bake them fry them it does not matter!
Have them at home, bbq at a friend’s house or camping!
You can have them anywhere!
So here is how I make my burgers that take only minutes to get ready.
Pre cook some pop them into the freezer, or leave them uncooked and freeze them.
It does
Either way that works or just eat them all and save none because, well they are yummy haha.
I have been making my burgers this way for years, and I will not stop making my homemade burgers. Actually would you believe me when I say I have not had a premade burger in at least 8 years. 🤤
That is really how quick and easy and of coarse delicious they are!😉
If your ready then let’s go, and talk burger making!
This is a recipe that can be make small or big you will see how easy it is to make lots at once.
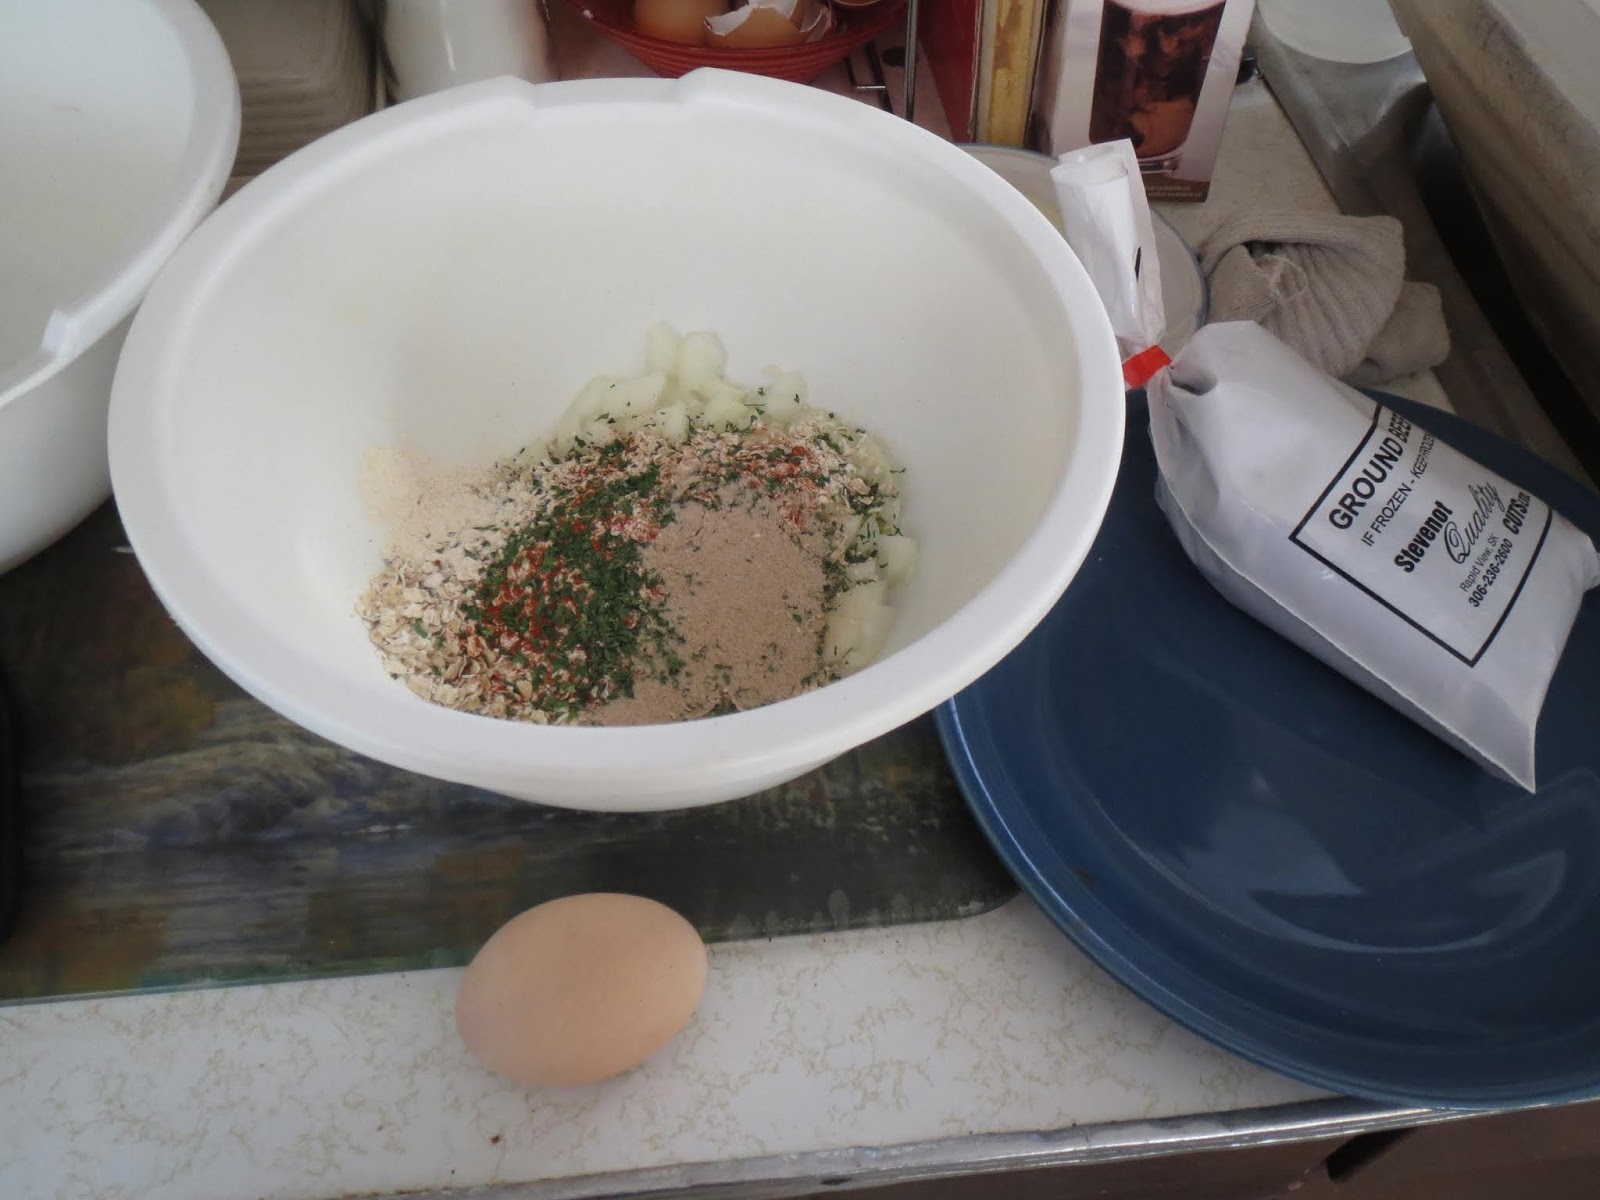
You will need for a batch is:
1 pound ground beef
1 cup rolled oats
1 egg
Diced onion
Spices what ever spices you want I use parsley,garlic powder, onion powder and paprika
In a bowl mix all together
I use a measuring cup usually at least 1/4 cup
Scoop meat mix and flatten into a patty, place on cookie sheet and repeat!
Yap it’s that easy!
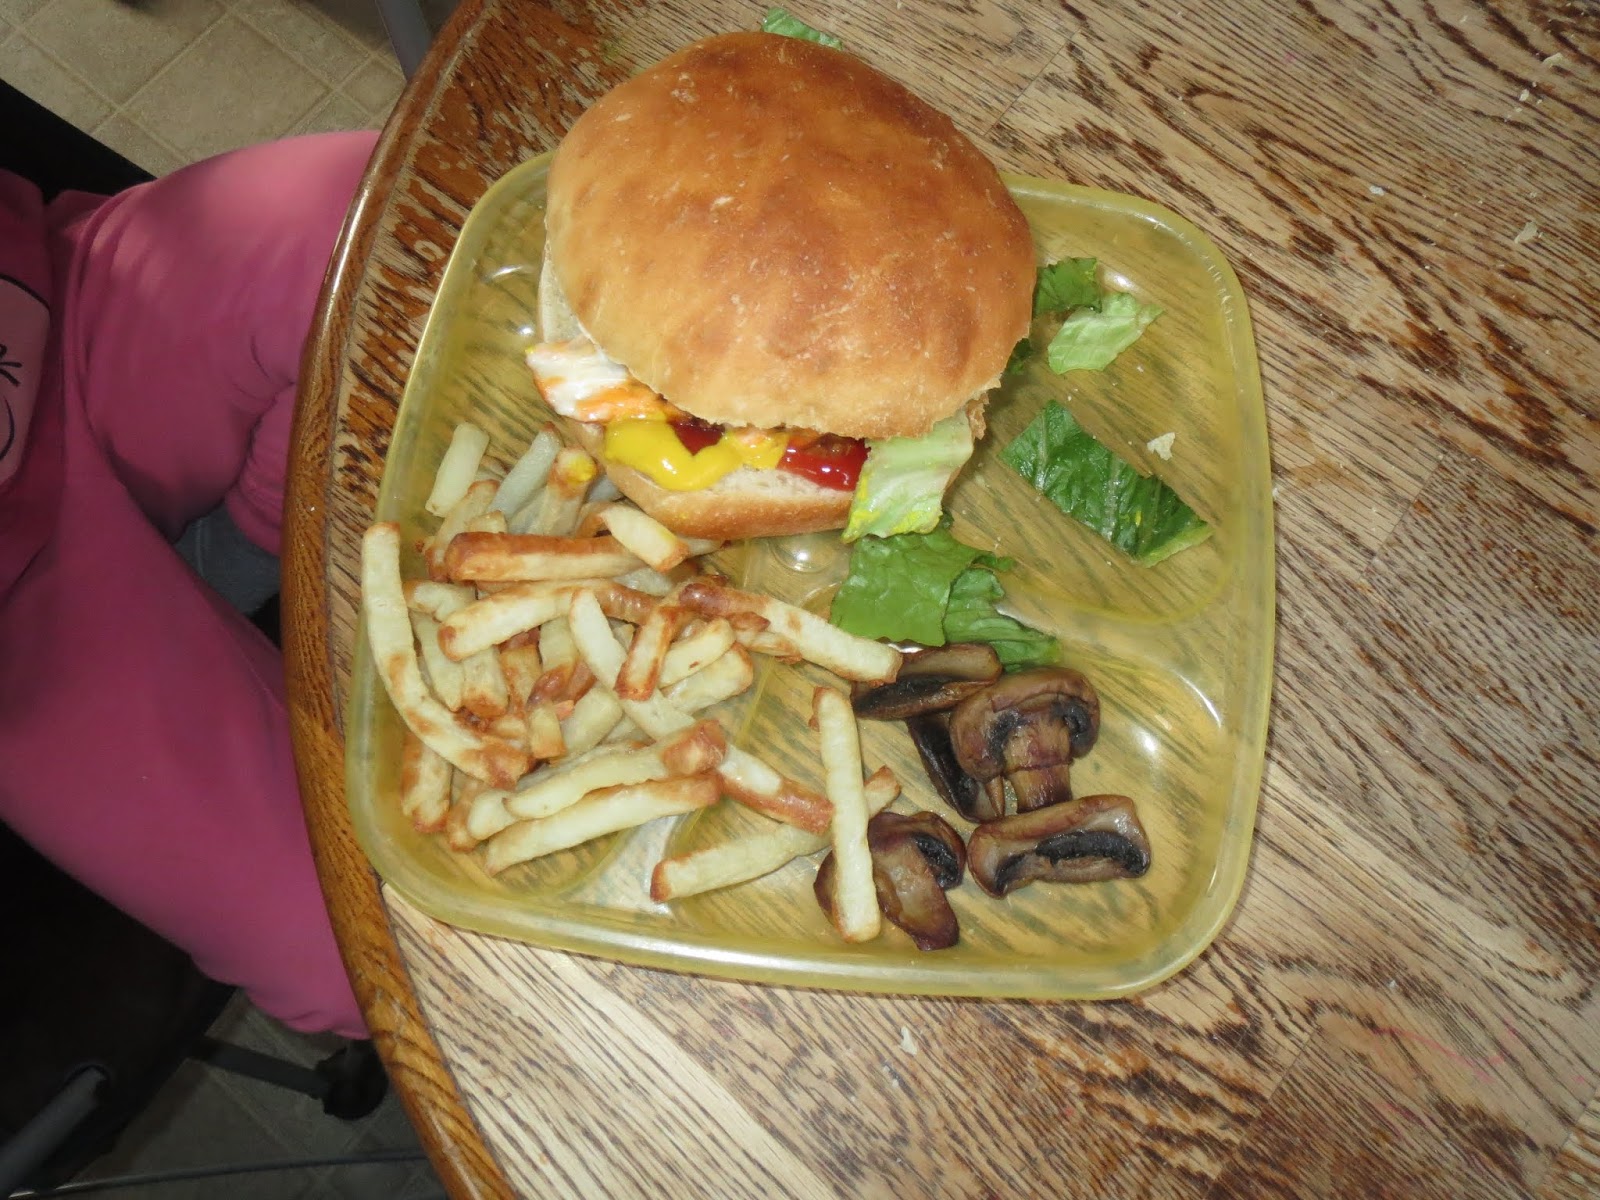
Grill, bake or fry about 10 min per side or until cooked all way through depending on the size of burgers you have made!
Then sit back and enjoy!
What are you waiting for you can be eating burgers any day of the week, with this easy go to yummy burger recipe!
I hope this helps get you through some of the summer days of the cooking cleaning, and repeat.
Go ahead and make a batch or 2 or 3 lol it will come in handy as the days get hot and the nights get long!
If you like this recipe let me know. Do you make burgers or buy bulk! Got room in the freezer put some in, I guarantee they will be used by the end of Summer!
For more daily tips and tricks make sure you go ahead and hit that follow button for all the upcoming blogs here on Classy Classic’s By Kandis.
Also follow me on Instagram under Kandis Blask and Facebook at classyclassicsbykandis.
The fun has just begun for the summer months.
Hope to chat with you on one of the pages, and share what summer foods you eat, to make it through the summer.
Have a great day and a awesome week.
I will be in touch on the social media pages and will have another blog up next week!
Got an idea you want discussed let me know, it’s all about making it together, so your thoughts matter, and I would love to hear them.
Till next week have fun and keep making those summer memories instead of all those meals! 😎😁❤
Cheers 🥂
I always heard, if you can make it DO IT. When I sat down and seen what I was spending on some products it seemed really silly. Why am I paying so much for something I don’t even know whats in it. To know that there is so much of a cost price just due to the time of year, where it was coming out of, and what was supposed to be awesome about it. It really made me sit down and think “how can I do this better.”
Hi and good morning and welcome to CLASSY CLASSICS BY KANIDS!
I will start by saying a little bit about myself! A few years ago I was trying to have a little more, I was budgeting and trying to have a clean house at the same time, while keeping kiddos content lol!
Times have not changed this alot, I love making my DIY products, I am a mother of 4 kids ages 11,9,3,and 1 1/2! I have been married for 12 years now!
When I sat down, I had quickly learned how much I was spending on cleaners. I knew they added up, but until I had sat down and looked close I hadn’t realized how much! I had then hoped onto trusty pintrest created a board and went to work.
Have you been following the other blogs? There is budgeting blogs that follow this one!
These are all little tips and tricks that I have learned while we were pulling ourselves out of debt. Go have a read, on how you can start a debt free life!
There is many ways of why you may want to start making your own products. There is so many things that one can make to either save money, or even just have a healthier enviroment! There is really no limit to what you can make yourself!
I am one to make more home products, I don’t do a lot of house decor (which I would love to start), I do more homemade cleaning and meal prep products.
Some of my favorite DIY’s that I have kept making and plan on to keep making are ones I found easy to make and will make a difference in your shopping trips!
I’ll let you know them and then we will talk about them with how you can make this in your home too!
Do you have some go to DIY products that you LOVE?
Leave it in the comment below!
First up is one I have in my life forever, its a staple in most grandmothers houses!
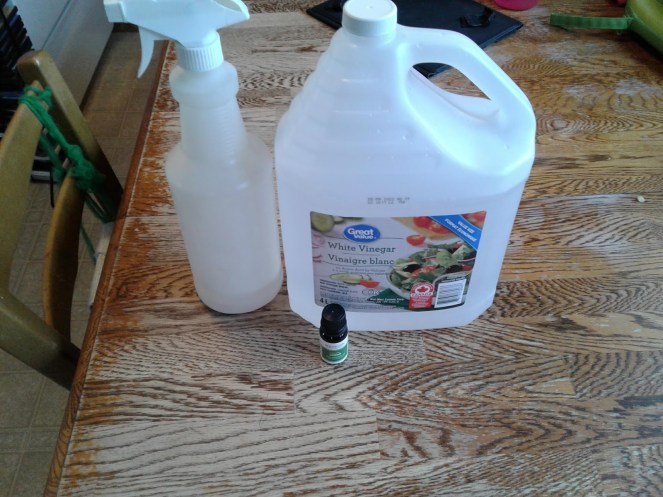
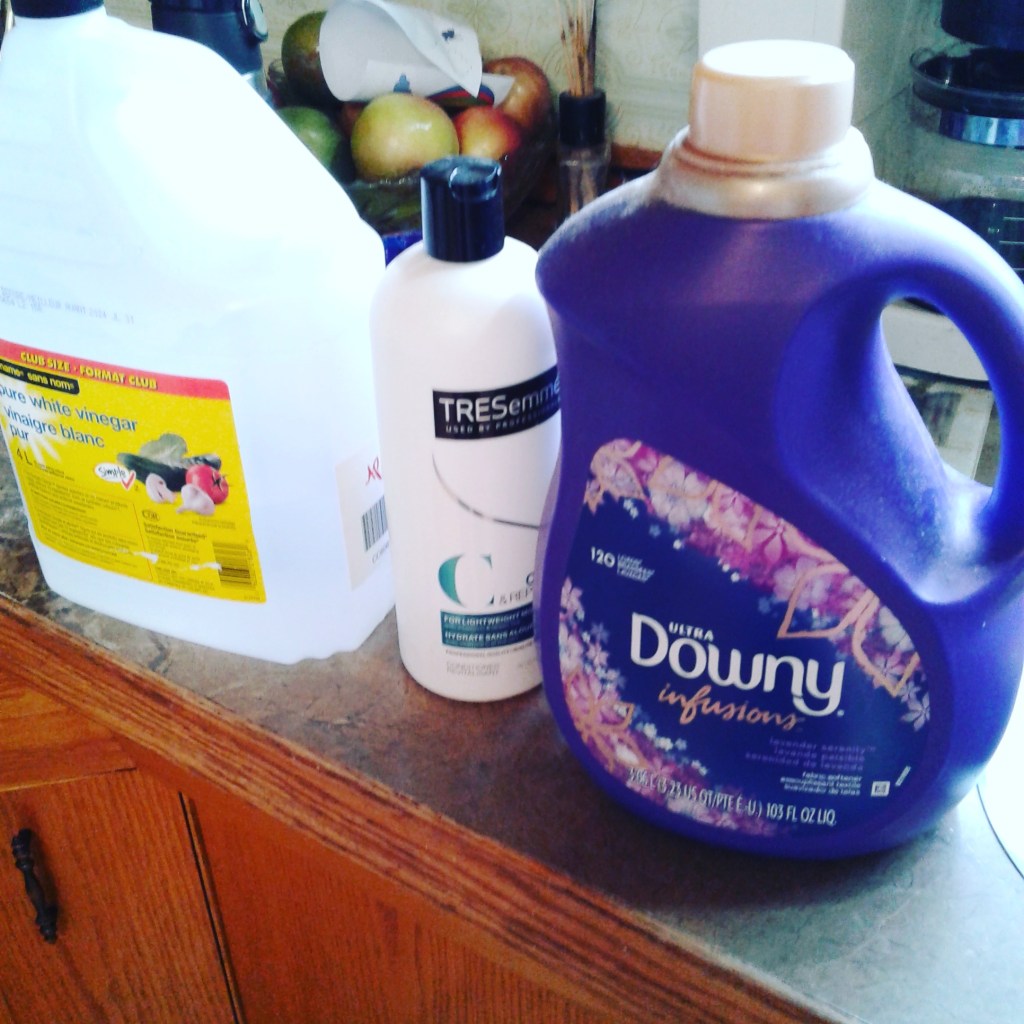
1) VINEGAR AND WATER…. AND ESSETIAL OILS
This mixture I have been using for SO LONG! This makes the perfect all purpose cleaner! You can spray this top to bottom of where ever you are cleaning, and simply wipe it down with a dry rag! This can be used on counters,cuboards, windows, fridge… I mean ANYWHERE!
All you need here is:
– a empty spray bottle
-white vinegar
-water
– essential oil for scent
Simply fill rougly 1/4 – 1/2 of the spray bottle with vinegar, fill with warm water and add as much the essential oils for scent. This cleaner will only run you pennies per bottle! Yes, you will get used to the smell of vinegar lol!
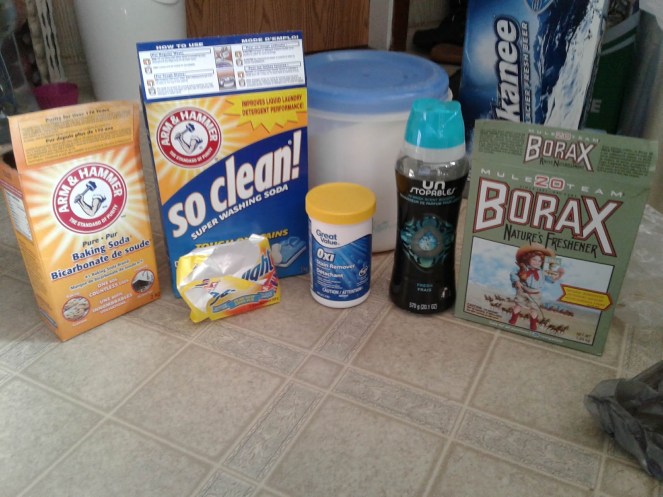
2) LAUNDRY DETERGENT
This one can save LOTS of money, as if you are like me it seems as tho there is ALWAYS laundry! It doesn’t seem to matter what laundry schedual I put myself on.. or try too there is always something that can be washed. Ecpecially with 4 kids.
To make this one you will need:
– 3-4 sunlight laundry bars grated
– 1 box borax
-1 containers oxi clean
-1 container arm n hammer laundry soap
– 1 large box baking soda
– 1 container unstoppable jar
Grate the sunlight bars into a large container, simply pour the other boxes together. Use roughly one scoop per load.
3) FABRIC SOFTENER
This one I have been using for just as long as the other ones! I was always so horrified on how much a jug of fabric softener was! So I just never used it. Then I found this and now I don’t like washing towels unless I have some made, because it is just wonderful.
This one is very easy to make, and only takes about 5 minutes to make!
– 2 cups conditioner (any kind)
– 3 cups of white vinegar
– 6 cups of warm water
Mix all together in on old fabric jug, shake it up and use a cap full as you would the store brand.
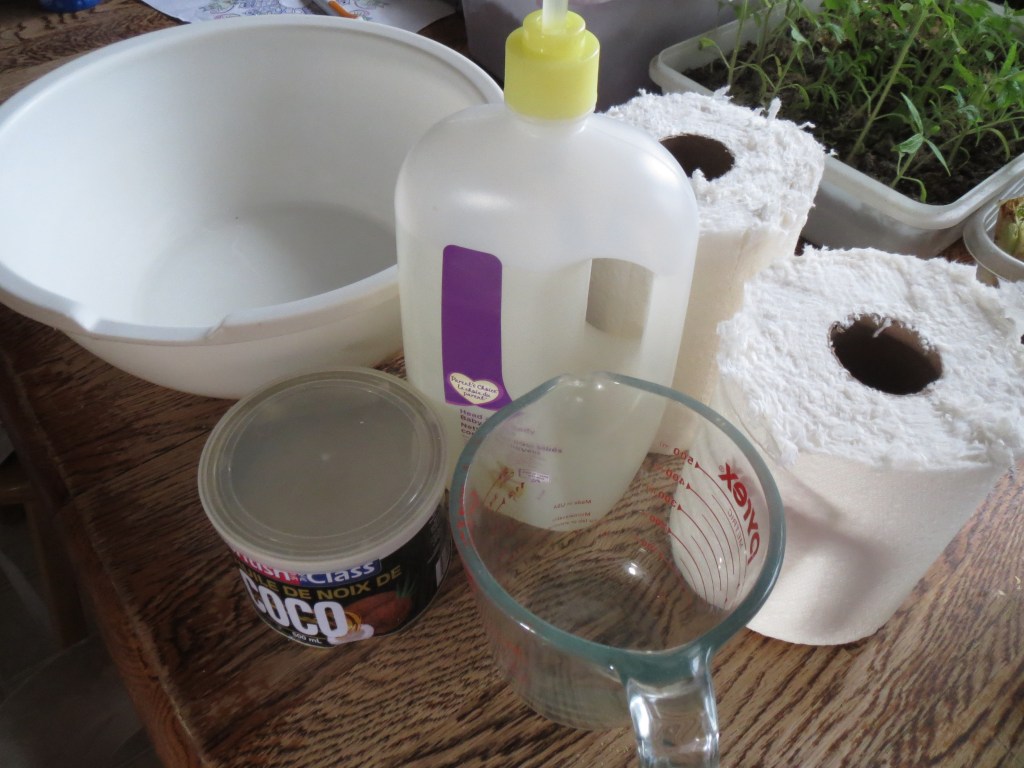
4) BABY WIPES
It is no secret that baby wipes are not only pricey and deffintly adds up, but they are not actually that good for babies tooshies. I have been making these since at least my third kid lol. These are so easy to make, and so unexpensive too.
– paper towel cut in half to make 2 rolls of squares
– 4 tablesoons of coconut oil
-2 tablespoons of baby shampoo
– roughly 2 cups of hot water per half roll of squared ( 1 full roll of paper towel cut in 2 = 4 cups water)
Mix the water and oil with shampoo, and wet the paper towel. Sqeeze water out, and if you want you can unravel it to make it an accoridian style for easier access when using. Store in a ziplock bag, or a air tight container!
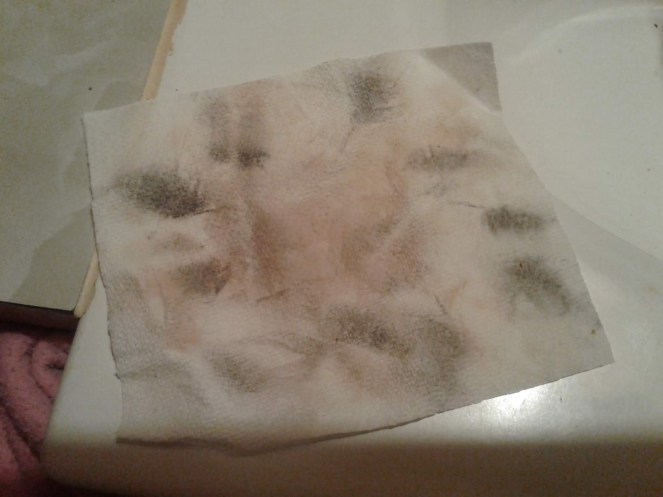
5) MAKE UP REMOVER
Make up is always expensive, then you add face wash, moisturizer and what ever else. Then to add at least $10.00 on for something that will make taking all the stuff off easier. I have been making my own wipes for years. These work great…. as long as you aren’t lazy while making them I have noticed. This has close to the same recipie as the baby wipes just less water!
– Paper towel cut in half
– 1 cup of water roughly
– 1 tablespoon baby wash
With these I need to point out that you should take the time to seperate the squares and not leave it rolled up in the roll, like you can when making baby wipes. These is the squares are not unravelled then they ALL don’t work as well, the ones in the middle just don’t have much oil on them!
These are some of my go to DIY products, there is so much more that can be made, from homemade pie crust or tortilla shells, all the way to homemade hummingbird food, to getting you’re own seeds from the garden for next year.
Let me know in the comments down below, what is one of your favorite DIY’s to make?
Did you enjoy the blog, give it a thumbs up, so I know to do more like this! There can always be more blogs on making products.
New here?
Make sure you are following, and subscribe by email to get notifications on when I FINALLY get a blog up. I aim to have one once a week, however it is 2020 and I have 4 kids haha, so REAL LIFE happens here a lot I have noticed.
Got a question or a topic idea?
Lets hear them!
Together as moms we can acheive anything!
Till next time have a great day, and a wonderful DIY making weekend!
With the month of March here, with the eco friendly month I thought what better time then now.
When Sunday had come and go, we were doing our prep and stock in the house. I realized how much I love to make some of my products that I don’t think about anymore and just make.
Do You make cleaners or products?
These are great for so many different reasons.
They are better for the environment, our bodies and best of all the wallet.
How much the products cost to buy vs to make!
This alone makes it easier for me to want to make them.
I have been making these for years now with no thought or intention to buying them again.
The first product is all purpose cleaner! I can use this EVERYWHERE from counters, windows, walls, toilets to sticky spills, and messes from the children.
This sanatizes, cuts grease and cleans with only costing pennies.
Ready?
In a spray bottle mix vinegar and water! If you want add some essential oils to make it smell and bam your ready to clean!
All purpose cleaner!
If you have babies in diapers then you will know how much wipes cost! I am here to say there is a way cheaper and healthier to use.
Take selet a size paper towel, cut it in half! In a bowl combine 3 tablespoons of melted coconut oil, 2 tablespoons of baby wash and about 1 1/2 – 2 cups hot water? Soak paper towel in the water mixture.
Wring out and if you would like unwrap in an accordion motion.Place in a zip-lock or air tight container, these are great, and will still work even if get forgot about and freezes in the car lol.
Baby Wipes with NO ALCOHOL
Another product that I have been making for a long time now is fabric softener! This is so easy and will save a ton.
Take an old fabric softener jug you will need:
2 cups conditioner (any kind),
3 cups of white vinegar, then
6 cups of warm water.
Add all together then shake jug.
FABRIC SOFTENER for pennies!
Another product I want you too know about is my makeup remover face wipes. These are used with the same solution as the baby wipes. The only difference is less water!
Take about a cup of warm water with 1 tablespoon of baby wash and 2 tablespoons of coconut oil. Soak paper towel and slightly wring out!
I am in love with these makeup remover wipes, my face feels clean, with no tighness of hidden chemicals in the store bought. I have no intentions on going back to buying these!
MAKEUP REMOVER leaving your face feeling clean!
Next product my laundry detergent, I have been making for a long time now! This uses:
boarx
baking soda
arm and hammer laundry soap
oxy
sunlight bars (grated)
unstoppable beads
LAUNDRY DETERGENT LAST SO MUCH LONGER AND COSTS MUCH LESS!
How about homemade fabreeze, the kids don’t like the “real” product anymore lol, so to make this:
Take an old bottle or a spray bottle, mix baking soda, with essential oils with water shake before each use!
FABREEZE change the sent added help with the baking soda!
These products I have been making now for years! They have added so much “cleanness” in my house, added dollars to the bank account!
Do you make products?
What kind do you make?
These are just some of the products that we make in our house, I love making my own stuff, it’s nice knowing what is in them, and knowing how much I save is just as sweet as the frosting on a cake!
I would like to take this time to say these products are in detail with pictures in my other blogs.
Head over and have a read, or you can write me with any questions or comments on these!
I hope you enjoyed this blog for the eco month of March.
Hit the like button too let me know if you liked it, so I can be sure to do more like, this!
Hit that subscribe button to follow me and get notice on new blogs every week!
Not enough 😉
You can also find me on Instagram under Kandis Blask or over on Facebook Classy Classic’s By Kandis for more daily posts with all kinds of fun!
Till next week have a great day, amazing week and productive weekend!
There must me something about the red’s and pink’s!
Hearts everywhere, gaining weight off the chocolate! Slowing down to smell the flowers!
In our house it’s extra special as my first born, my only daughter was born on Valentine’s day 11 years ago. Yap my daughter turned 11 this year.😣
Valentine’s day is always fun, with treats and cheesy sayings it’s just a fun holiday.
Every holiday I send teacher gifts, and valentines day is no different. Do you send teacher gifts or treats to the classroom?
This year a little less but with just as much love and thought. That’s what makes the gift any ways is it not?
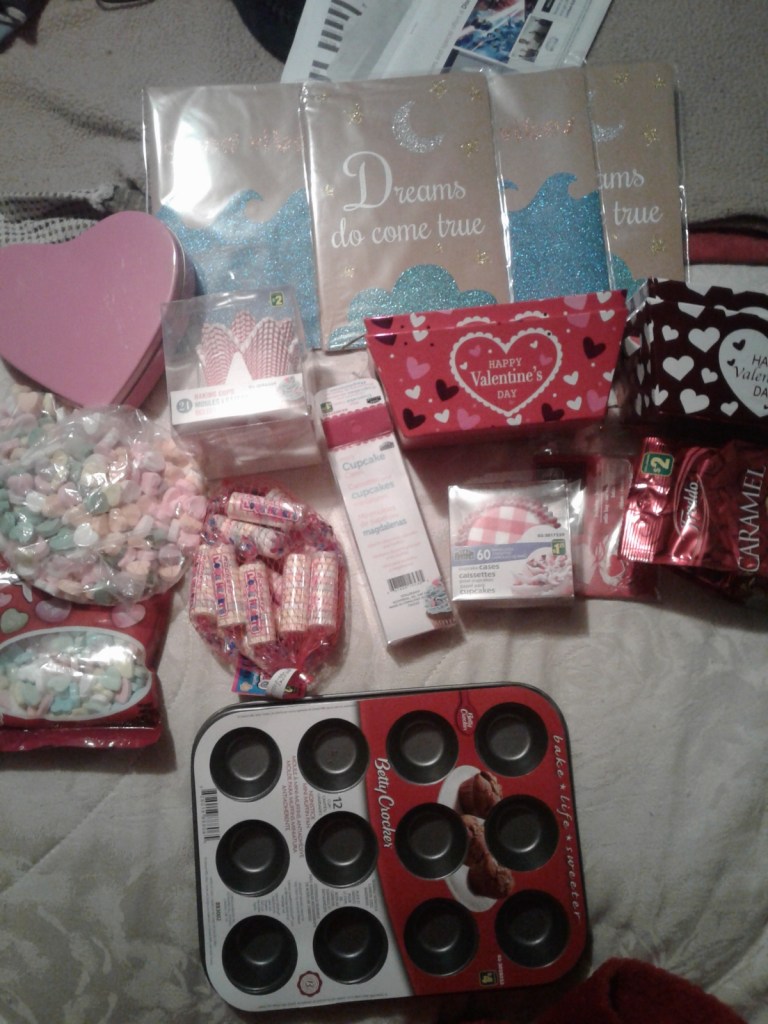
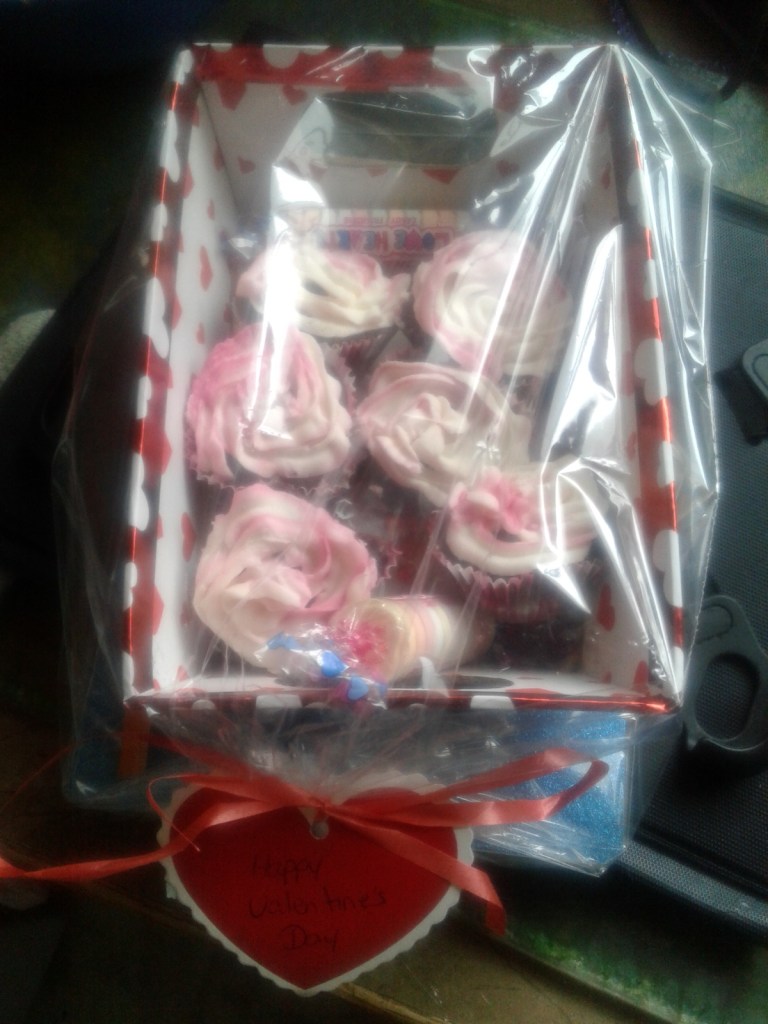
With being on a little more tight budget I’ll show you what we did this year, I will also, point out it was done for roughly $5 a person. As usual I hit up a dollor store and set out.
Dollar Store Haul! I love dollar stores! ❤
This year I purchased a
Valentine’s Box
Notebook
Candies
Cupcake liners
I then made mini cupcakes and found some unused pencils in the house.
Teacher gifts in the making!
The turn out was adorable.
For the classrooms we bought valentine cards ( which we usually make), we also of coarse also treats. Lots of cupcakes went into the over in a day, but they are so cute.
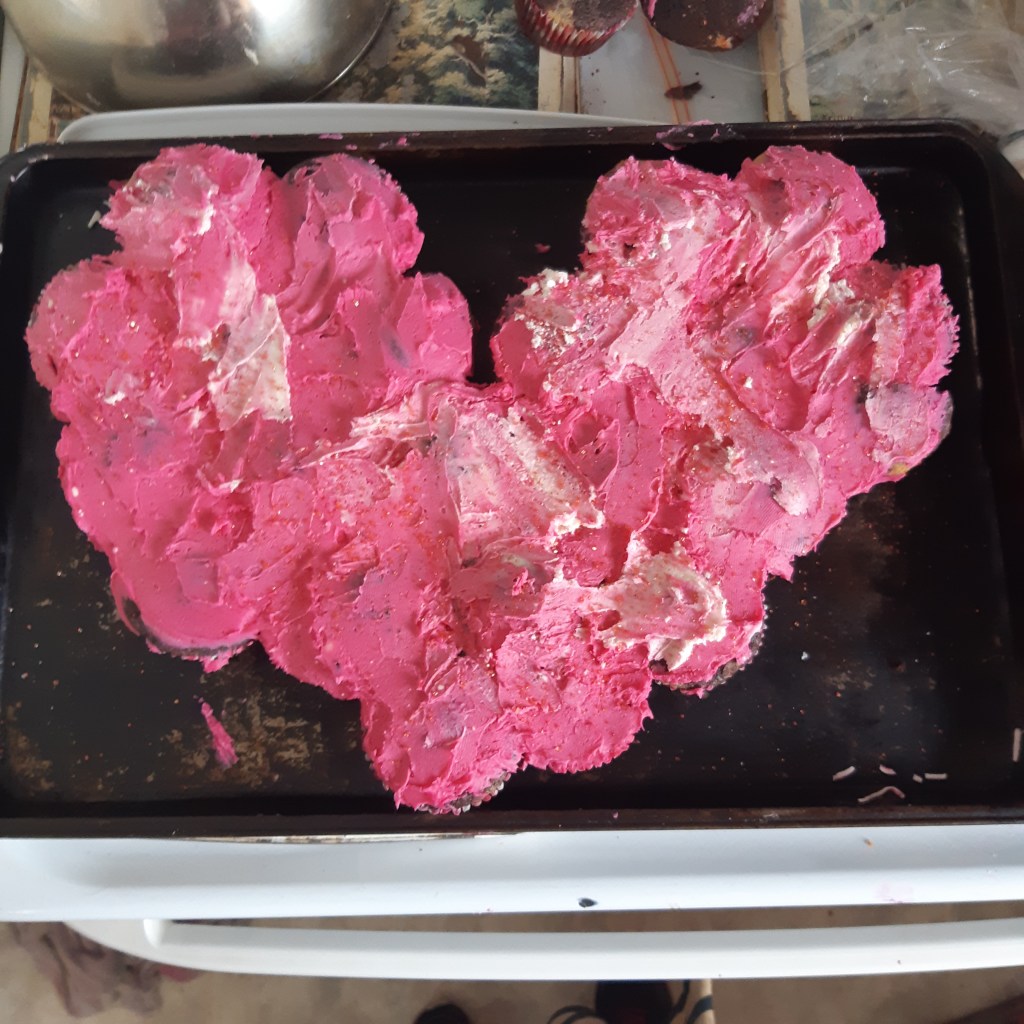
We made heart emoji cupcakes for my son’s class, and a cupcake cake for my daughter’s class. I had also made a cake for her birthday.
Where to start with all the Valentine’s day fun!
Let’s start with the teacher gifts. In the box there is some conversation heart candies, a couple chocolates and a pack of sweethearts!
Then I placed 6 mini cupcakes on top! The boxes came with a plastic wrap, so just put the notebook under the goodies box with a pencil on the side, got the toddler to help tie them up and BOOM, awesome teacher gifts for $5. The bus driver got the same, but in a cute pink heart tin and no notebook!
All for roughly $5.00!
Then I placed 6 mini cupcakes on top! The boxes came with a plastic wrap, so just put the notebook under the goodies box with a pencil on the side, got the toddler to help tie them up and BOOM, awesome teacher gifts for $5. The bus driver got the same, but in a cute pink heart tin and no notebook!
How to make the treats?
Let’s start with the emoji cupcakes.
Bake and cool the cupcakes, with yellow icing for the face, I used conversation hearts for the eyes, then drew on a smile!
Yes, really that simple for little time.
Heart Emoji Cupcakes!
The cupcake cake in the shape of a heart was just as quick and easy.
With cupcakes baked and cooled, place them on a pan in a shape of the heart! Take your icing, tink it pink or red….. of coarse, with a knife ice the cake!
I start at the outside and work inward!
That’s really as there was, it all turned out better then I thought, and most importantly the kids loved them!
These are done for very little, but will send the love threw the air!
Heart Cupcake Cake!
What did you get for Valentine’s day?
Do you go all out?
Send goodies?
Make or buy cards?
Let me know in the comments!
I hope you enjoyed the valentines day fun blog, hit the like button so I can do more like these.
Don’t forget to hit that subscribe button to follow and get notification on the new blogs every week.
Want more come join me over at Instagram under Kandis Blask or over on Facebook Classy Classic’s By Kandis for more daily posts!
Till next week, I hope you have a great day, wonderful week and productive weekend.
Another year, another round of giving! Do you give out gifts for the kids extra people? This year is all about simple and thoughtful!
Hi good morning and welcome to Classy Classic’s By Kandis!
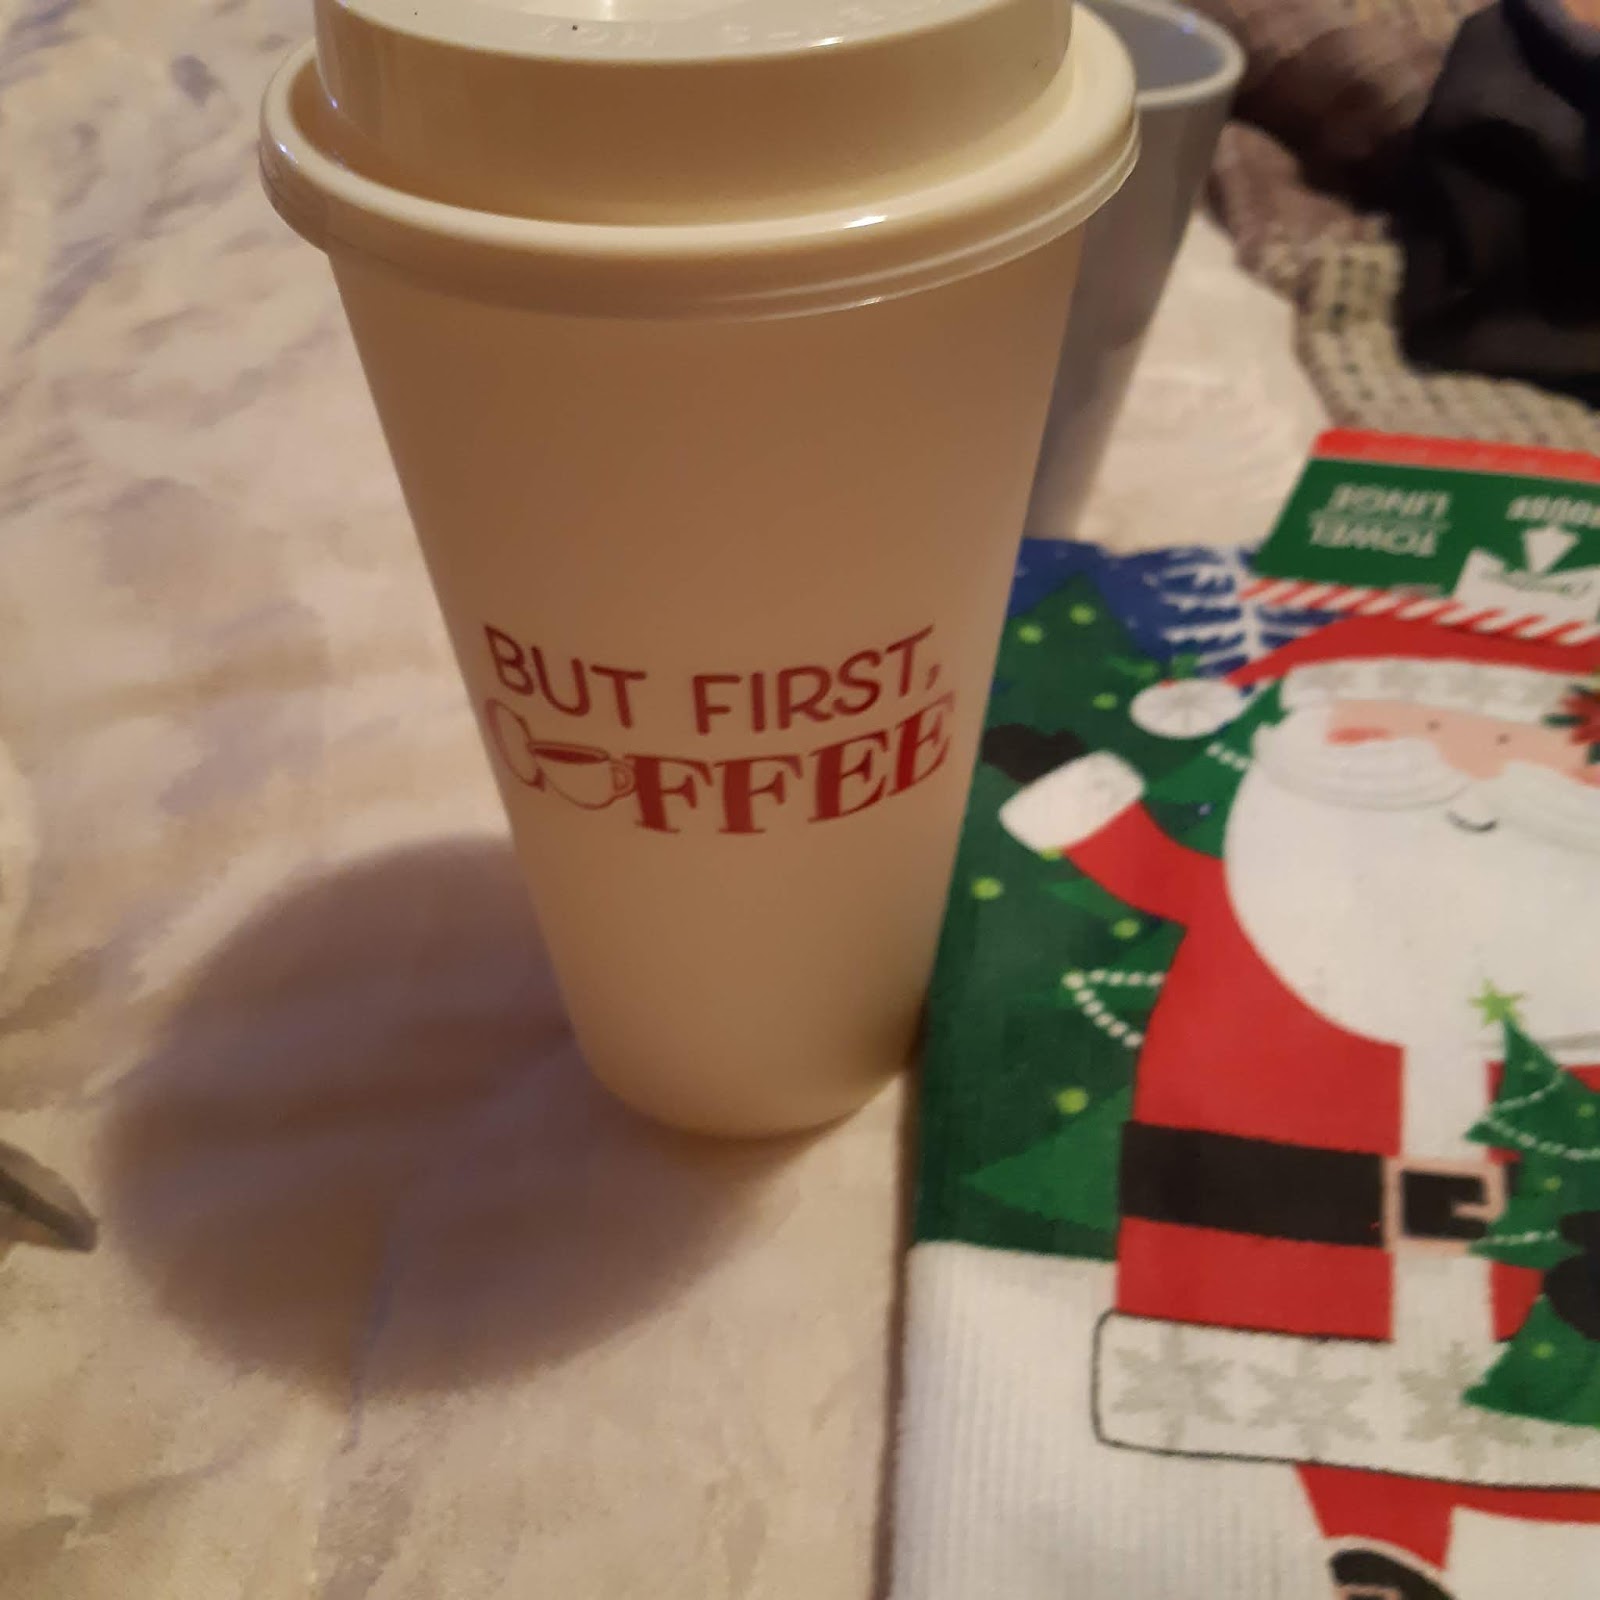
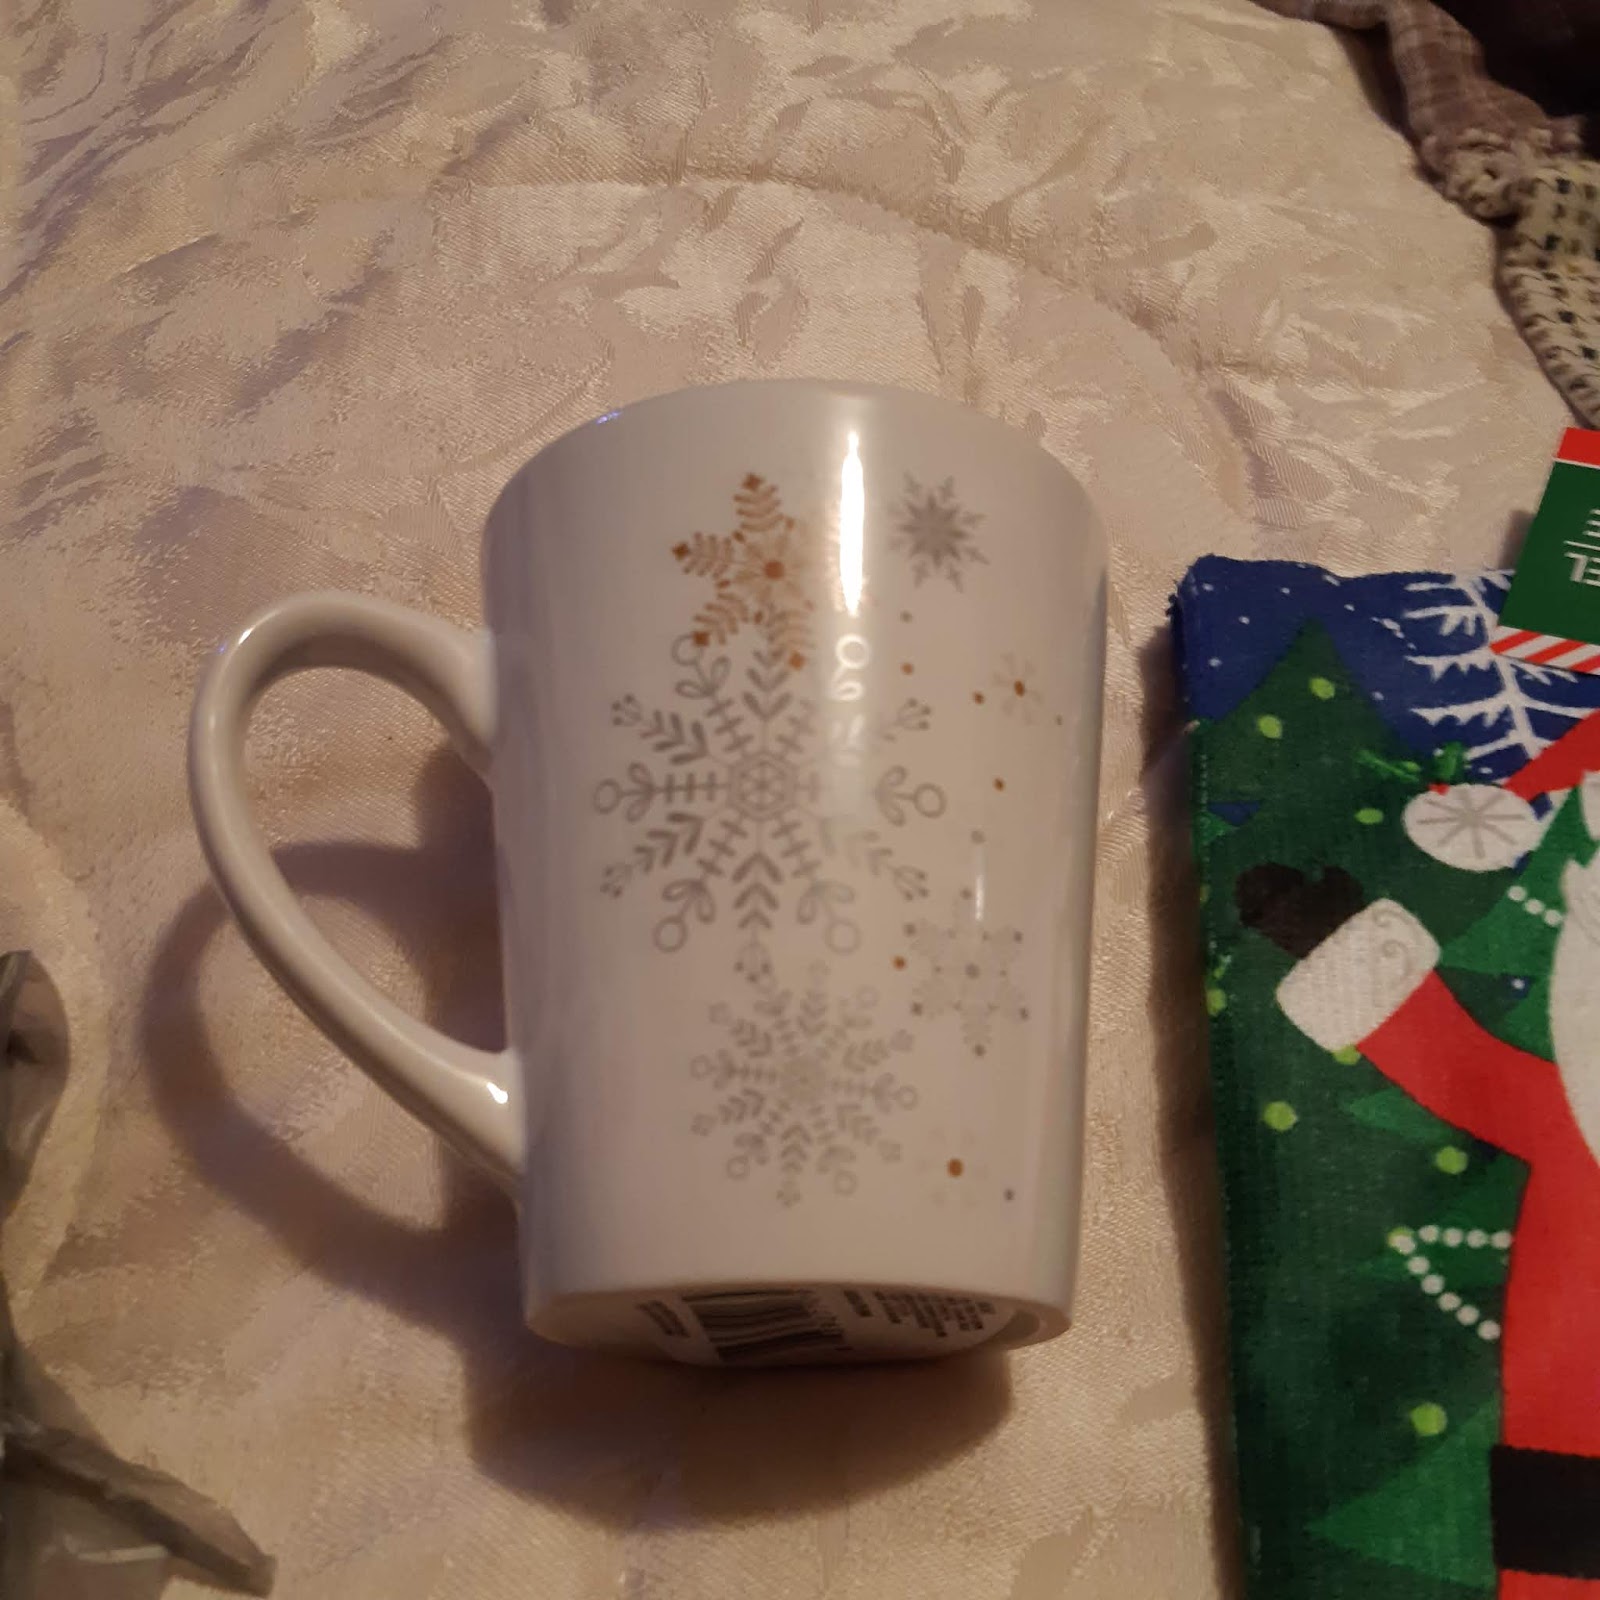
Can you believe it’s almost time for the jolly man to come? This year for the teachers we thought we would keep it clean, simple and cute.
With the year coming to an end…. a very long emotional, stress testing year, I decided it’s all about the giving, in a smaller way!
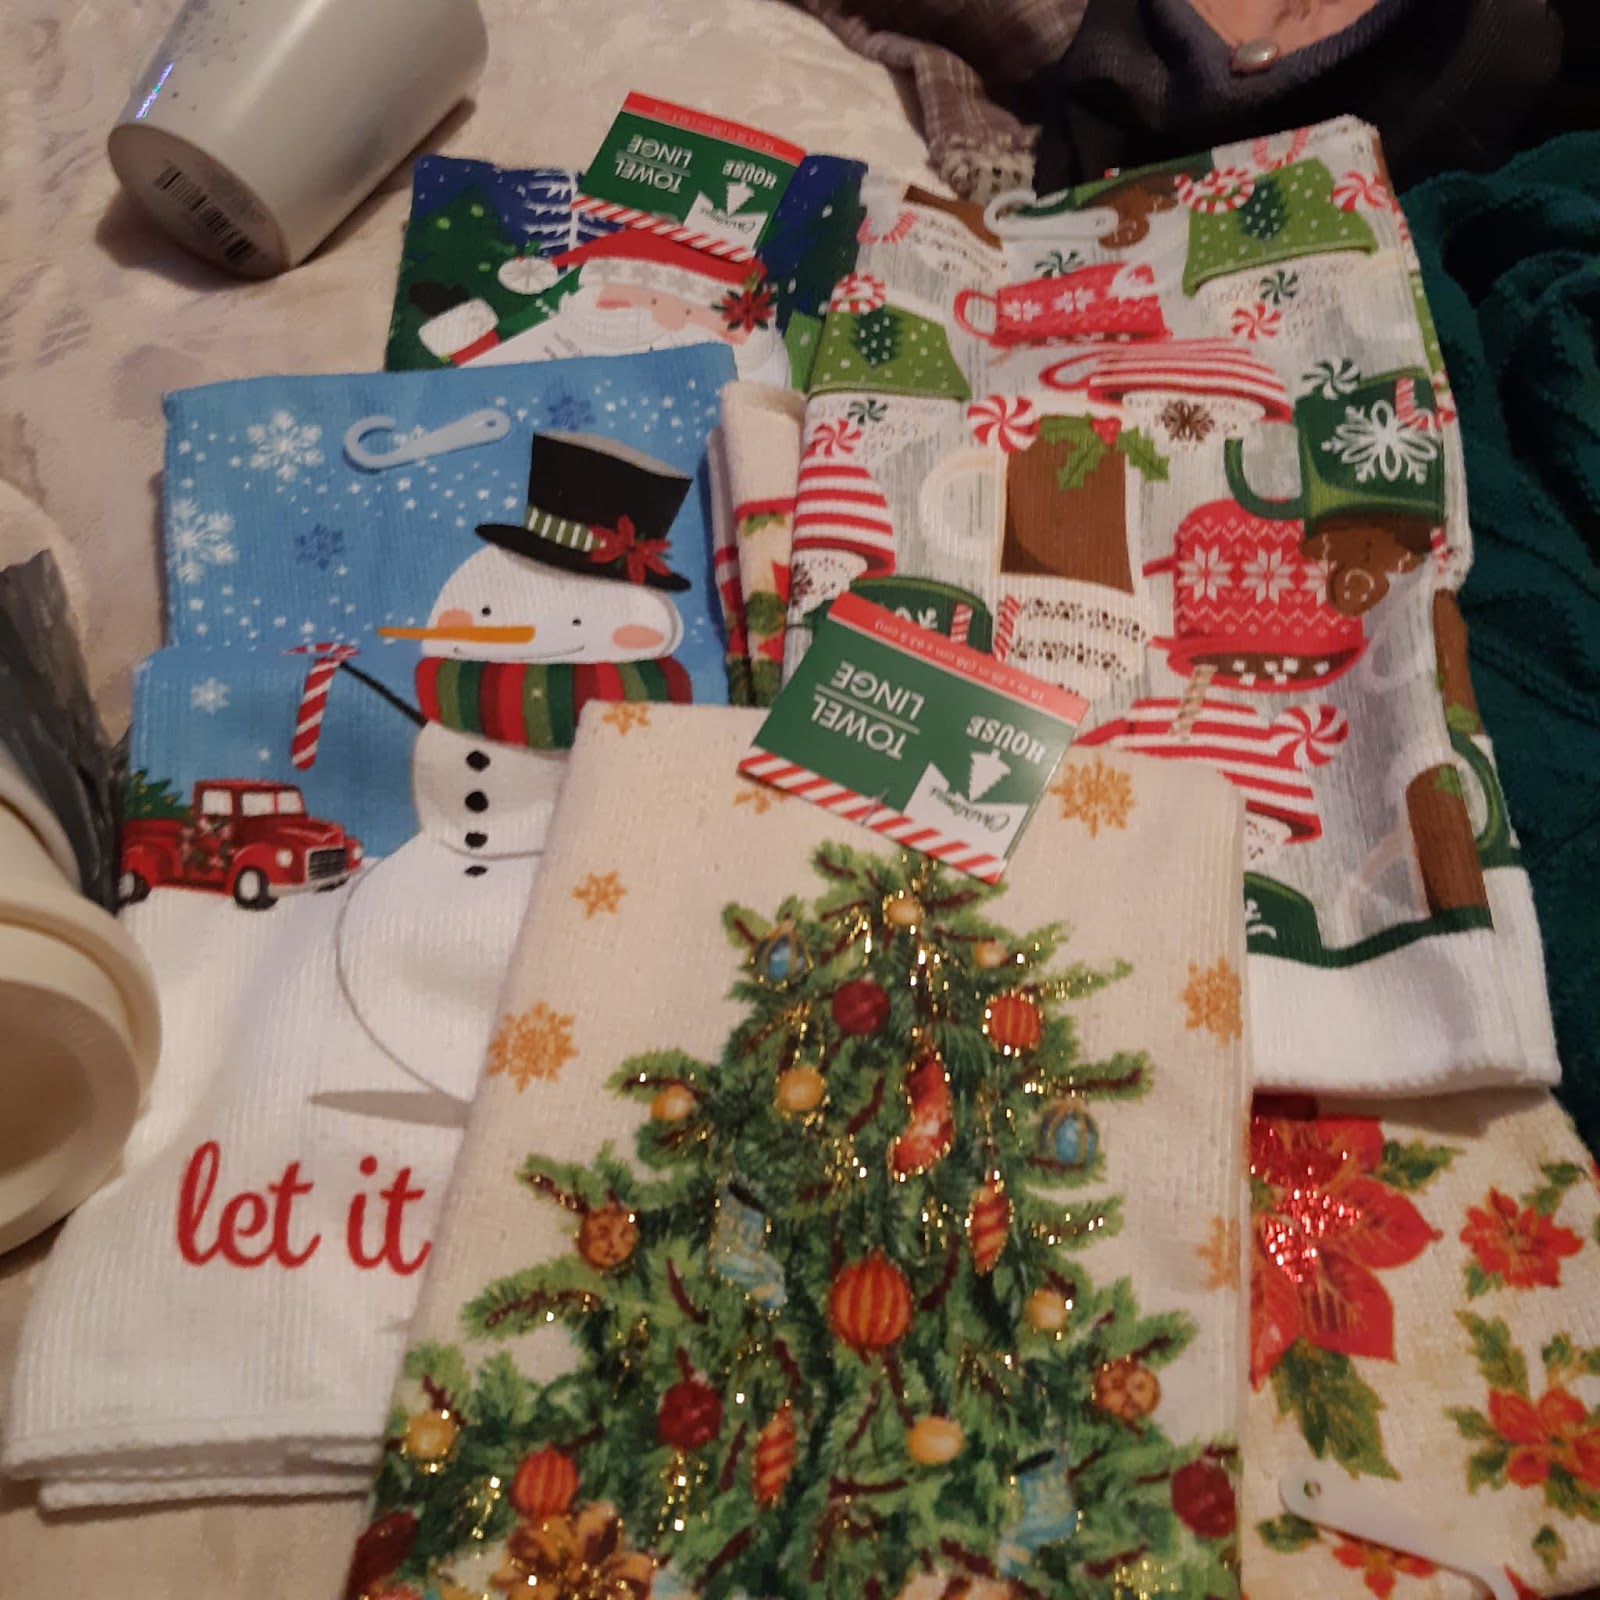
My kids have 4 teacher gifts to give out this year. I am the mom that will put so much thought and extra into gifts that it almost become more then it should! So this year I went to the dollar tree and had it set out for about $5 a teacher. This may seem little but I really like how they are coming together!
If the gifts seem “not done” that’s because, well they are not! Hahaha. I wanted to get the blog set up tho to help with so e cute ideas for this holiday season when it comes to the “other” gifts.
The teachers, bus driver, leaders, coaches ECT.
These little gifts that are probably the cutest I think to make, but can add up quick if you don’t pay attention. I did around $5 each to make under $30 for all the extras. They are also all the same other then the towel design is different, just to show some extra thought. This is also tho we are from a small town where everyone knows everyone. So if that is not your case or style it is very easy to make them all the same and be fine.
How ever like I said they are not quite done, only thing that is missing is small items for in the cup, and the cookie trays are not done yet!
Next week I am picking up the stuff to finish and the trays will be done by then as I have the baking mapped out on my weekly to do!
Head over to my blog on 5 tips for a stress free Christmas, to see what I do to help break, up the tasks throughout the weeks.
So back to the main thing haha…. squirrel brain!
This year I really like the feeling on these!
There is a cute mug, travel cup, Christmas towel, cookie tray done by me 😁, then to finish it off I am going to fill the to go mug with little goodies and hot chocolate mixed!
All hopefully tucked in a cute basket wrap! This is also cause would you believe when I went to the store I could not find a cute Christmas basket!
All wrapped up I think they will be so cute, easy to carry and very yummy and thoughtful!
I’ll make sure to post updates as they get completed. We however have about 2 weeks till they need to leave my house, so as I said they will get finished this week!
I hope this gave you some ideas for those little gifts. You can also head over to last year’s posts on Instagram.
Make sure to follow me on Instagram under Kandis Blask or over on Facebook Classy Classic’s By Kandis. There will be the finished product there also lots of daily posts on day to day fun and ideas. Lots of motivation and everything in between!
I hope you enjoyed this week’s blog, make sure to leave a comment so I know if you like this kind of blog!
Hit that subscribe button to never miss a blog, new blogs on Saturday’s!
Till next week I hope you have a great day, amazing week and of coarse a thoughtful warm December!
When growing up the garden was always there. My mom always had a garden, if you had the room you grew a garden! That was how it was.
We learnt never to say we were board, especially when mom was in the garden! You were not going to be board long, she made us help with the gross potato beatles!
To this day I remember how gross they were and I am oh so thankful that I do not have them! I think it was the kind of potatoes that she grew.
I remember getting into trouble for my best friend and me eating all her peas, or chewing up the green onions cause it made out spit green! Haha oh the memories in the garden.
Those memories have changed a little as I am the one planning, planting, weeding and pulling, prepping and so on. With this said I could not imagine not having a garden. It’s a lot of work, but the outcome can be so great. The years have changed and out weather is not the same…. by know means.
It has almost been freezing here already and it’s August. With the last couple days of August here, it is time to start getting some out, and prepping for the end of the year. I had a couple picks already, with hopes of another good round.
However, it has been a pretty wonky year for the garden, and my time has not been quite there with out secret mission on the last big push now. I thought I would take you along thought the garden this year and share what I have got, and what I am doing with them, to help get us through the winter! Do you garden? What grows great for you? What seems to just not grow? Let me know I love a good garden talk!
So the weather is not changing and it is time to get stuff out. When I had started the blog, as I ran a week behind.
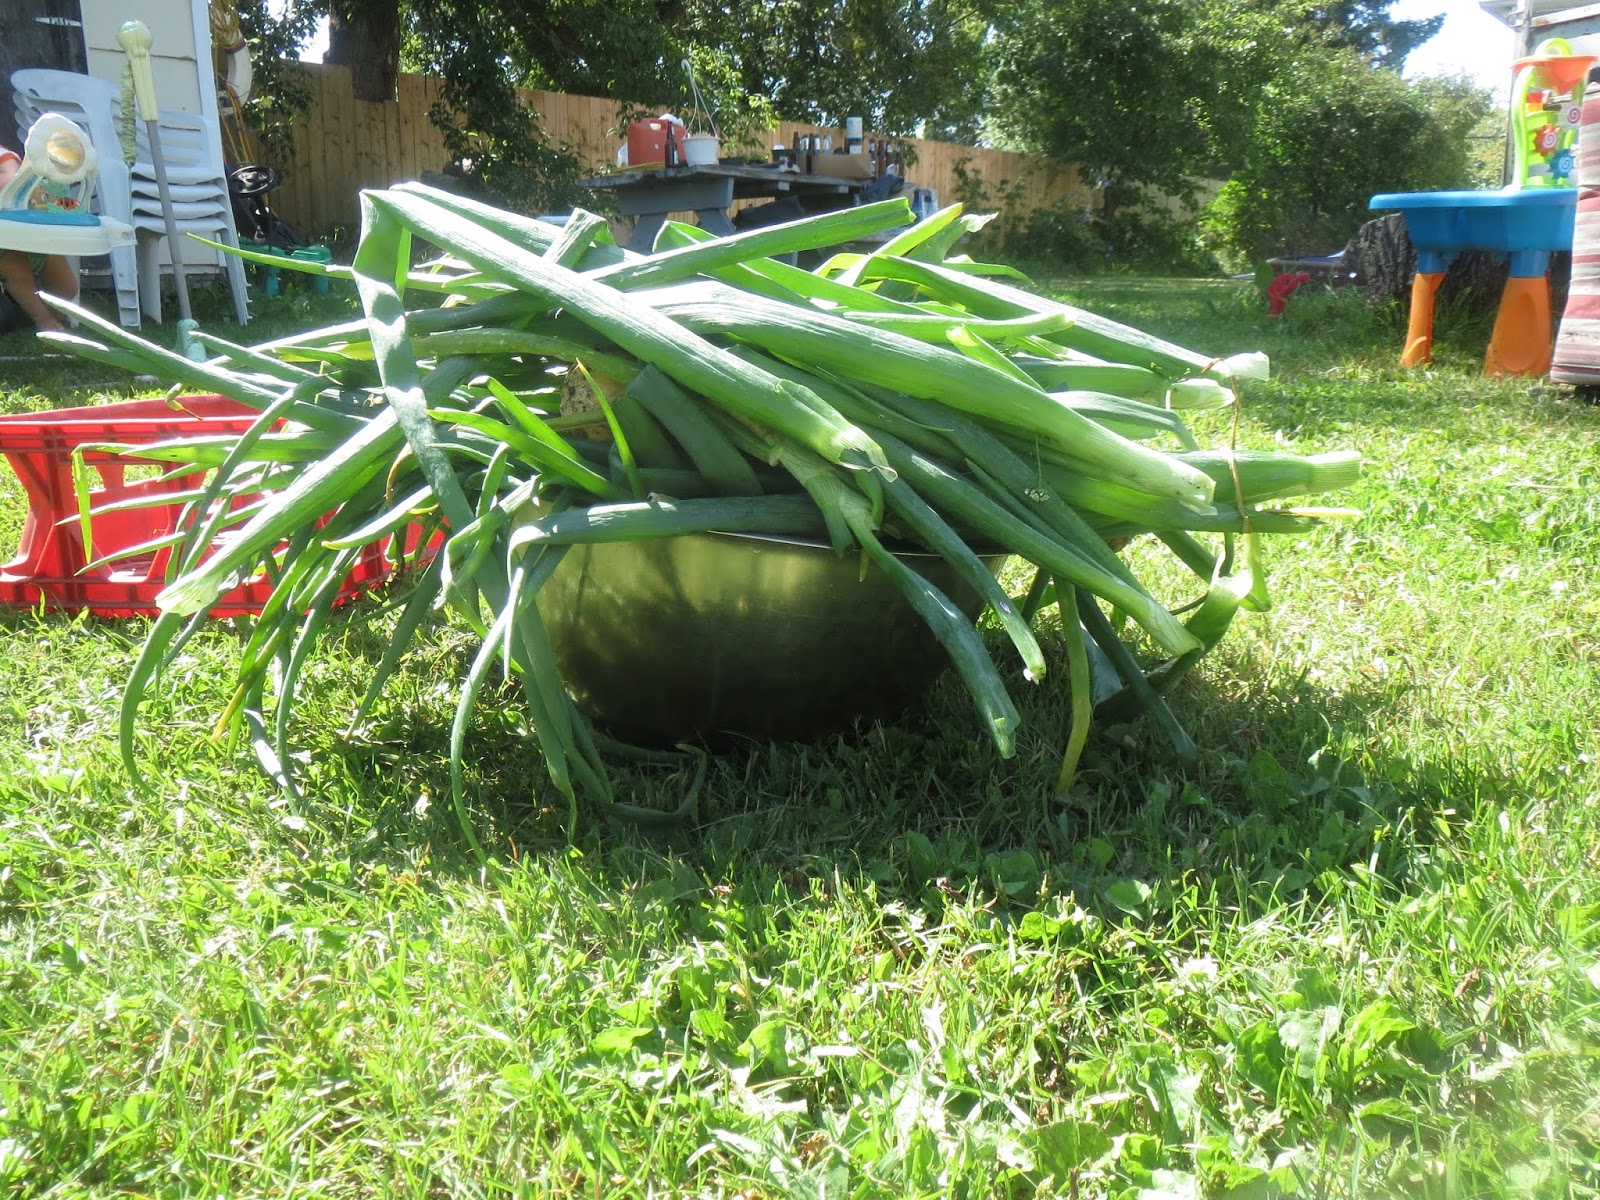
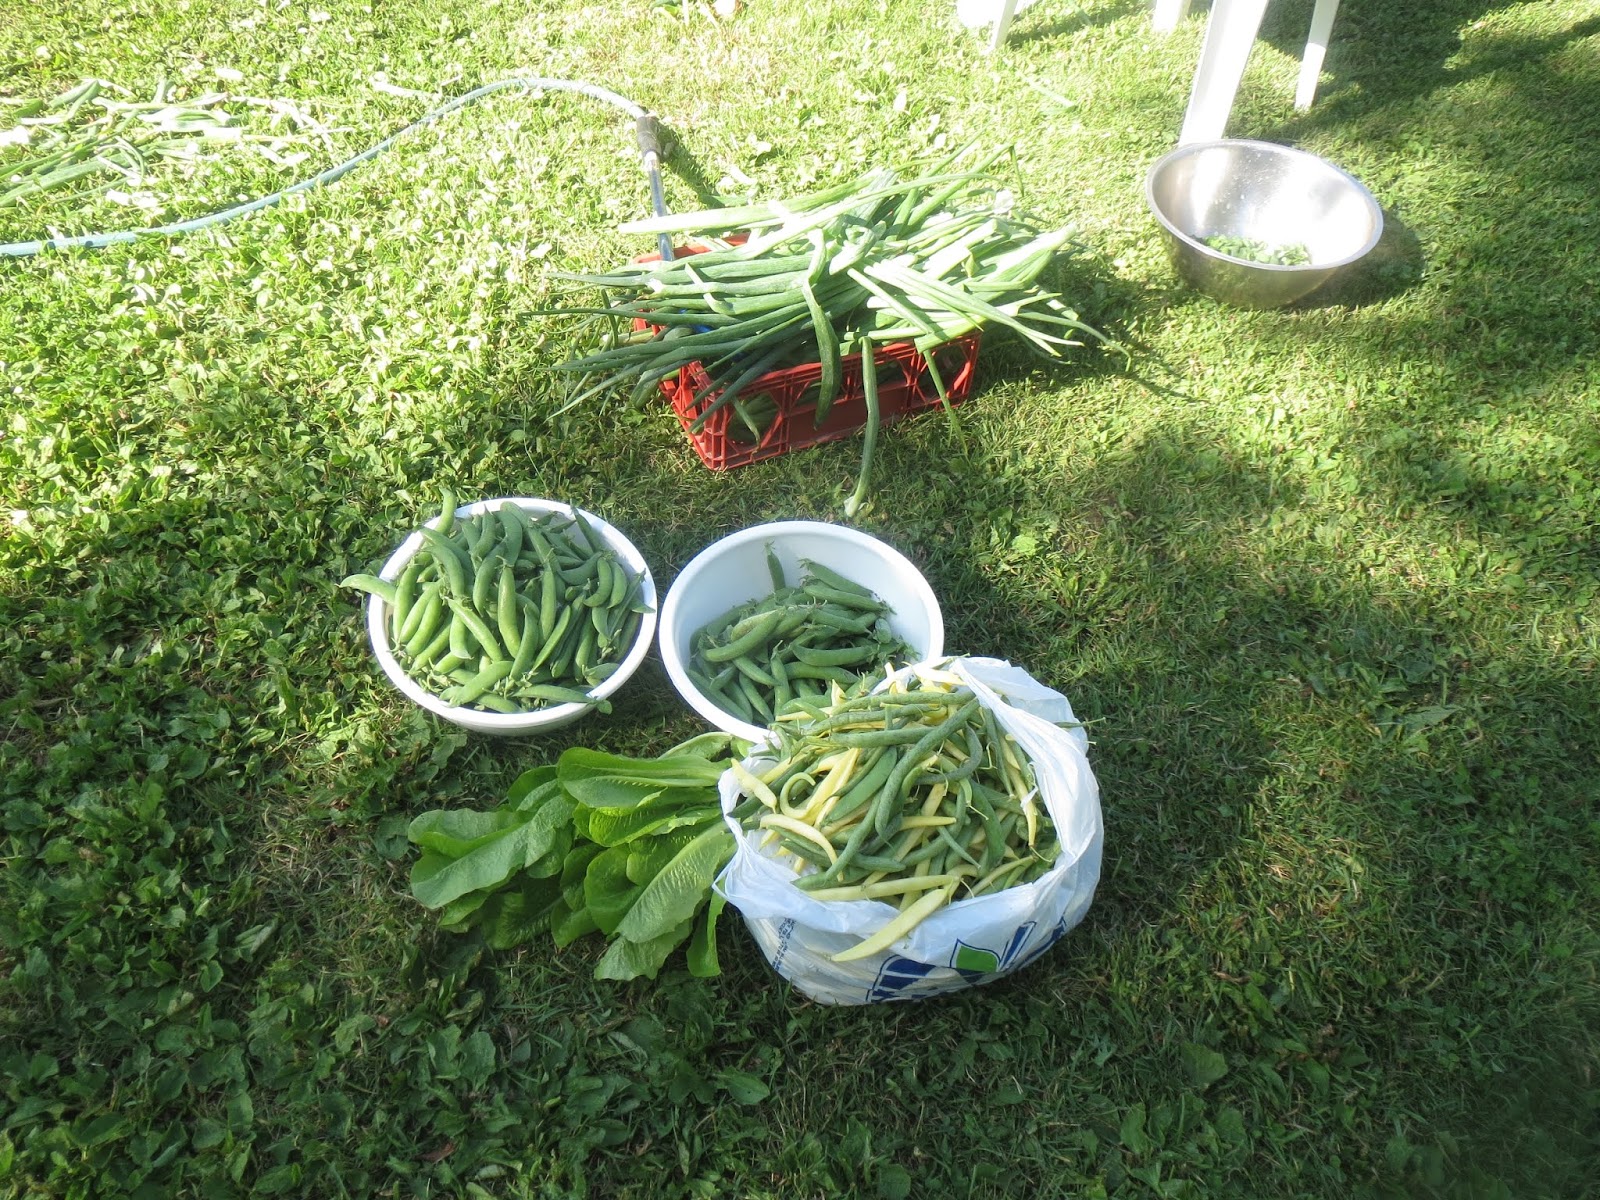
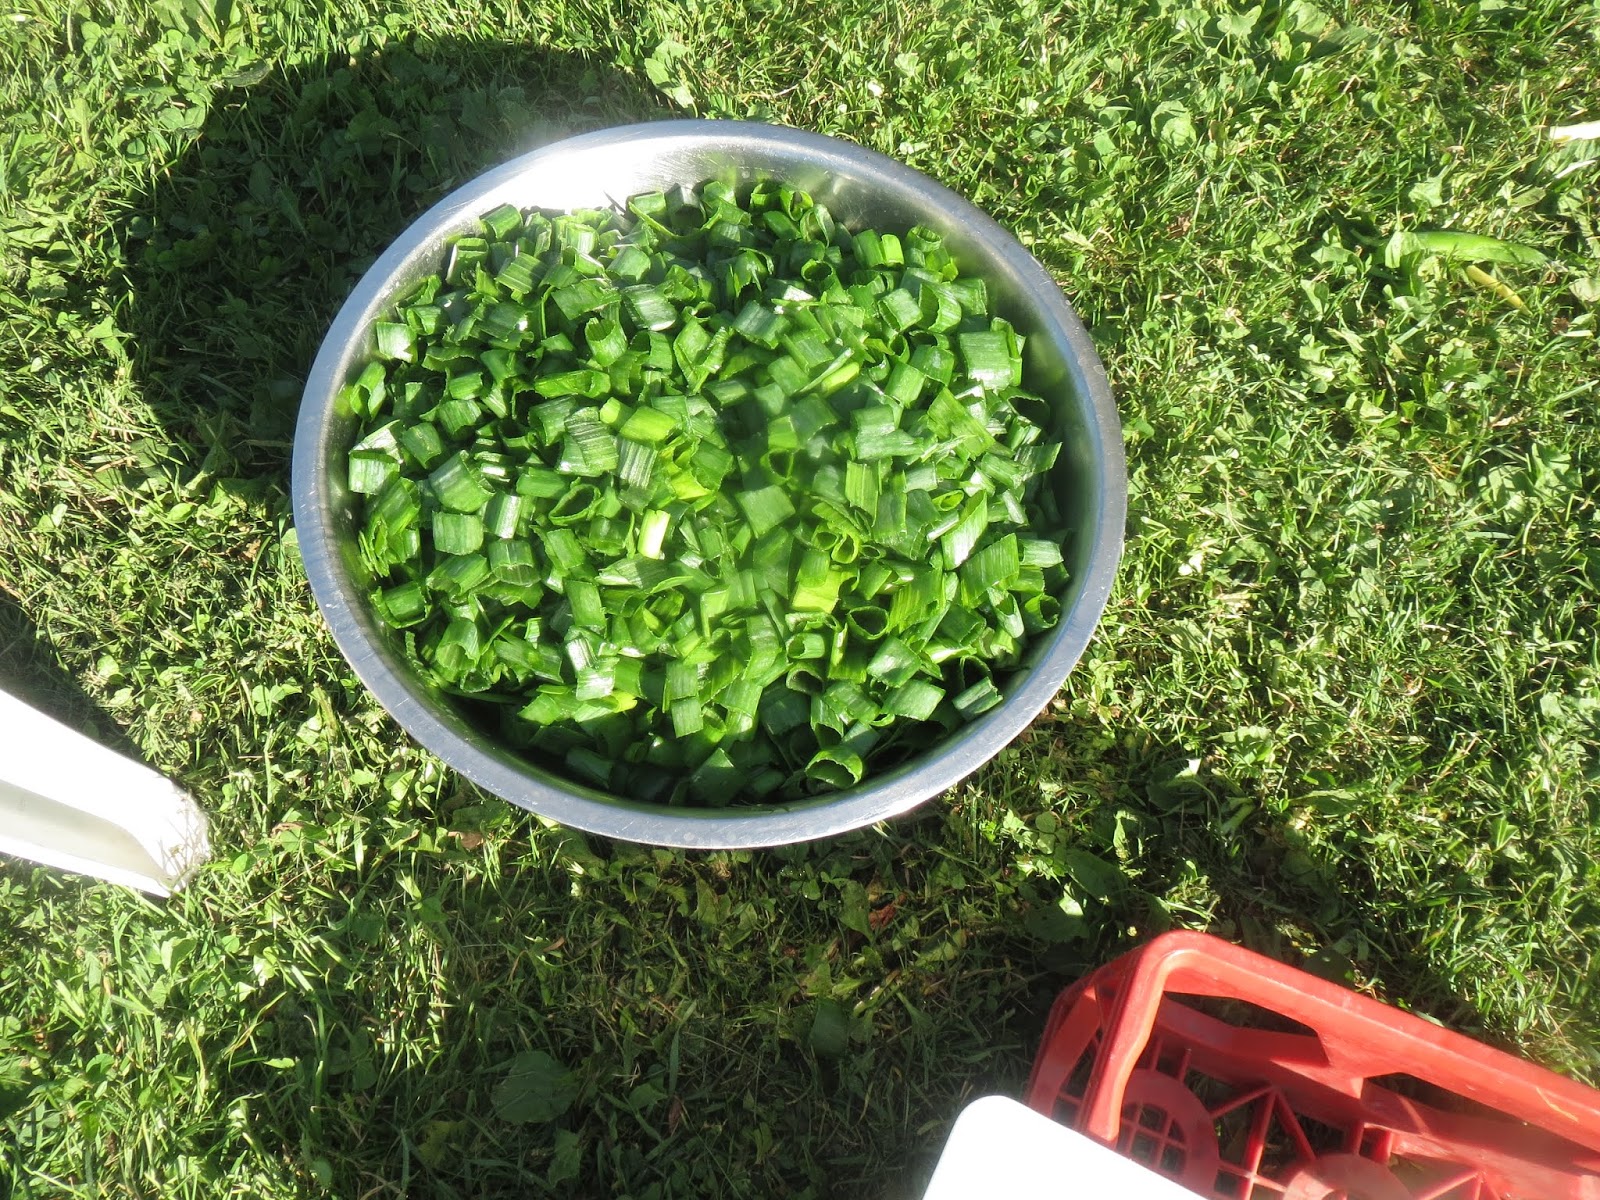
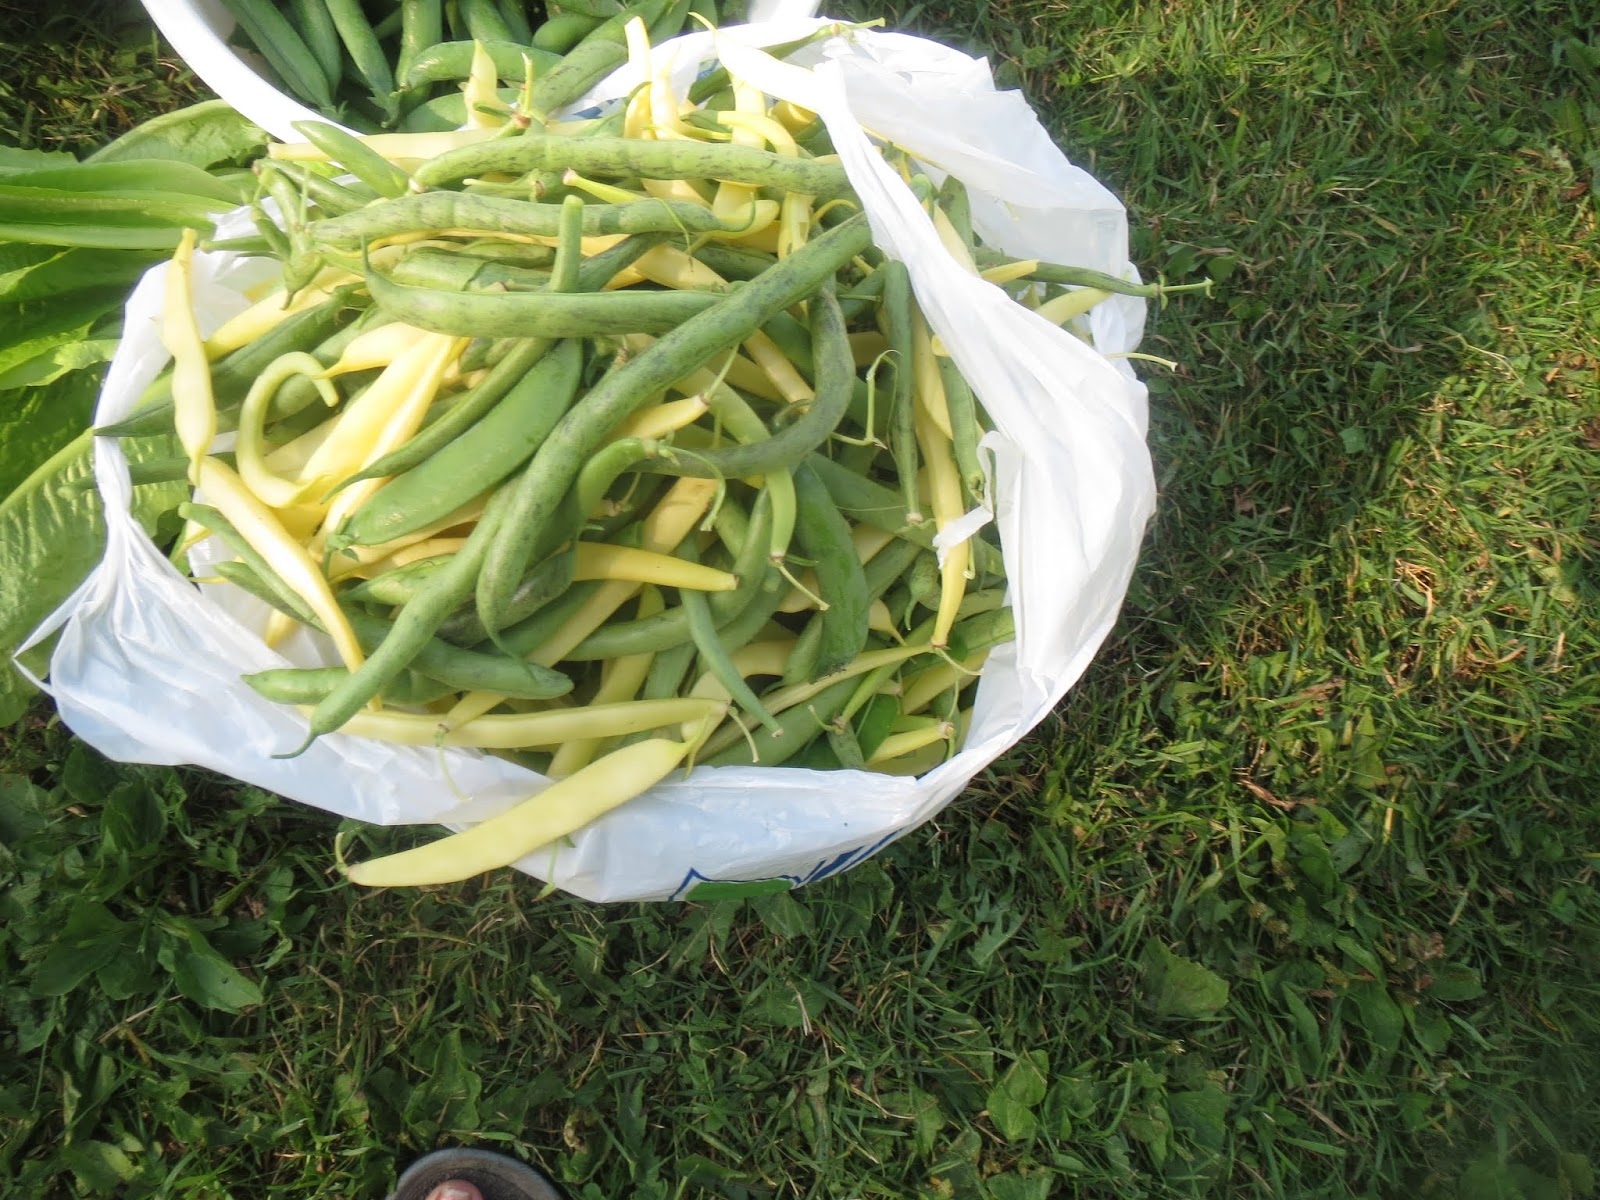
Last couple weeks I have been picking lots of peas and beans out of the garden! Radishes did good this year, these I plant with my carrots as radishes are the first things up and our of the garden it does not interfere with the carrots growing. I will share how the carrots did on facebook when it comes time to get them out!
With picking them we got about 3 grocery bags of them. I also picked my one big row of green onions, I pick them, twist down the top after cutting the grown onion off, this allows the onion bulb to continue to grow after. I slice the green onions and dry them for winter use in cooking!
Cabbage I’m hoping to get some they did really good however the bugs tend to get at it. You can peel the layers off, till you get to where they didn’t get. Beware they go to the base tho and tend to wreck the whole head of cabbage really fast!
Cucumbers did not do good this year, they just didn’t come up good, and with how the summer went, I did not try to replant them.
Broccoli and cauliflower did not survive the crazy weather. Beets I am hoping are good, there are some thing that stay in the ground till the end, as the leaves can frost and they beet will be ok, so those stay for now, same with the carrots. I will let you know how they did when the time comes!
Brussels sprouts did ok, they stockes got bent, these can also stay, they say Brussels sprouts taste better after the first frost, so I always leave those till the end, but just as the cabbage the worms love it and can take a whole plant down really fast. I will have to see if they survived this year.
Peppers are doing good, they will be picked soon and placed in a box to ripen up, you can do the same with tomatoes. Pick them when the weather is getting cold and they will ripen inside! Have you done this, to make sure they tomato makes it, and does not got hit by frost!
Then the melons, they are coming, this will just come down to is there enough growing time for them to make it worth it. They are blooming and growing, but with such a short growing year it gets hard, never mind almost freezing weather in August!
As for my potatoes for some reason I have issues with them! I actually assume I am not hilling the enough, so next year I will try harder to get lots! With how much room they take up, and I am lucky enough to have a farmer supply me with lots for the winter it’s ok that they are not always great. However I will figure out how to make them great, to get my own winter stash!
Now that is it September everything will be coming out and being prepped for the winter get months. What do you do to safe your garden produce? I will be sharing how I prep my vegetables on my Instagram under Kandis Blask and Facebook at classyclassicsbykandis!
Make sure to follow to see two it goes, what I do, and the different ways to do some!
I hope your garden and summer went amazing!
Tell me about it, on here or one of the social media pages!
I would love to hear and have a conversation with everyone one summer and garden fun! Till next week have an awesome weekend and a week! Have a topic you want to hear about, just let me know! I would love the input and ideas! Till next time happy harvesting!
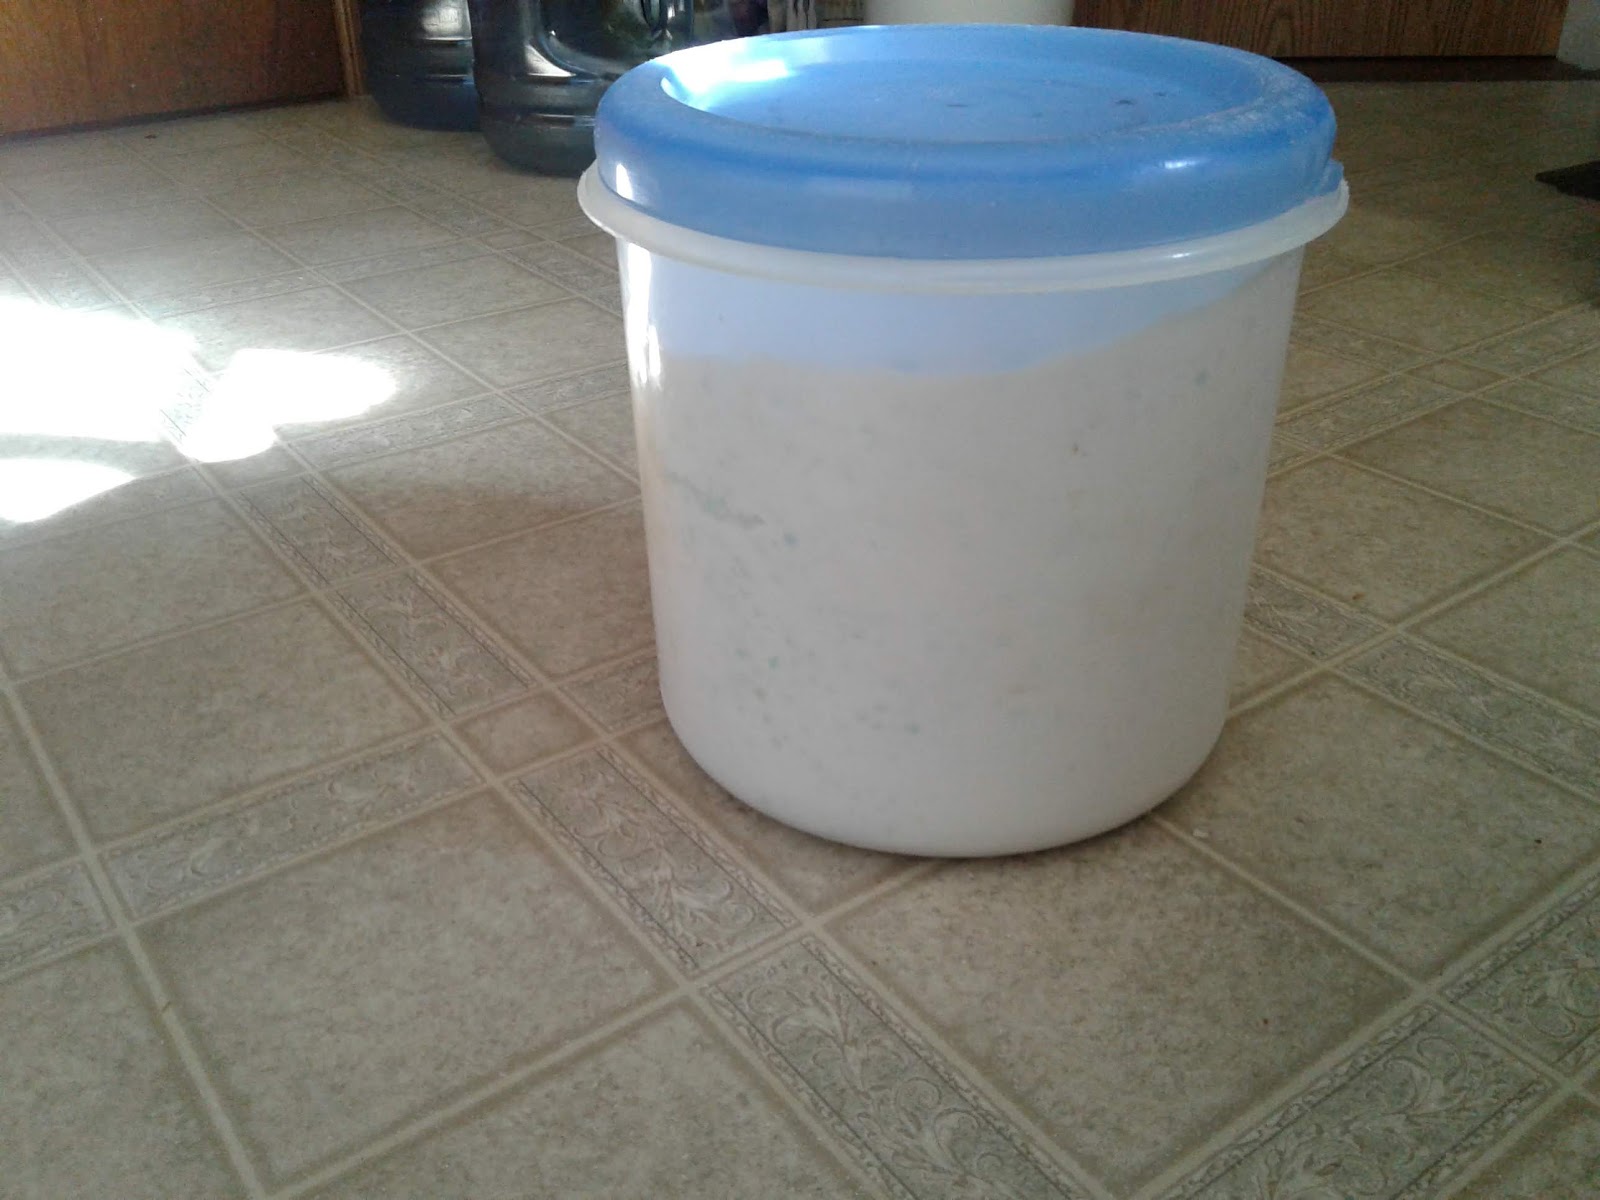
Good morning everyone and welcome to Its A Mom Life! If you are new here to Its A Mom Life, make sure you hit that follow button for all the blogs here! I am all about mom life and every thing that it comes with. As you can tell by the title this blog is all about homemade laundry detergent! This is something that I have been making for a while now, and when I run out I always kringe on the store bought stuff now. I of coarse had found this one Pinterest, I will leave the link below for you! It is easy and lasts a long time. It will last me between 6 to 10 months. In have never but wanted to take note of how long it lasts. I like that I can find the items easy and for the most part it is just mix together and carry on. I use a big tub for this as it is a powder. The most work is to grate the laundry bars with this I just use my cheese grater. Yes just my kitchen grater as I find it fine to use on soap. So let’s talk about what you need. You need:
2-3 bars or Laundry soap I use sunlight bars
borax
arm and hammer laundry soap
unstoppable
large box of baking soda
oxi clean.
That is all there is to make a large batch, with not needing more then a small scoop as I use one of the scoops from a cleaner anyways it works out great. So just grate your soap and pour all the other stuff in. Mix it up and good to go! This works great for all our clothes, big and small husbands work clothes and he works in the oil patch, to mamma stains and the endless kid stains. This will coat me less then $60, which is ideal with how much laundry I do. All the time the laundry is there for me lol. So give it a try! Let me know what brand do you use, do you like it? Give this a try, is it better or not? Worth it or not? If you liked this blog today let me know in the comments down below. Till next time have fun with that mountain of laundry. May the odds of catching up ever be in your favor. Have a great Tuesday and I will talk to you and others soon!
Good moring and welcome back to Its A Mom Life, if your new make sure you go ahead and hit that follow button for all the upcoming blogs. Grab a coffee, and join in the topics, I have a variety of topics that get covered Here on It’s A Mom Life. So if your ready let’s do this! It’s Thursday which is a new recipe! How to make icing sugar. I find it costs so much to make icing sometimes. The amount of icing sugar that is used and for the fact it’s like $5 bucks a bag… or something lol, it can add up really quick! I find I run out when I need it! So one day push came to shove and I had to make some! Where I always to when I need to find something trusty Pinterest! I will leave the link below however this one is so straight forward and easy, the only thing I will say that I didn’t like is that it is more gritty, as it is hard to grind down enough. All you need is 1 cup of sugar to 1 tablespoon of cornstarch. This will make 1 cup of icing sugar. All you do is put this into a grinder (if you have one), I use my blender. The blender does make the sugar warm tho and so I’m cool it before sealing the bag, I just use a large zip lock bag! So if your in a pinch, give it a try, let me know what you think in the comments down below. Till next week happy baking, make sure you enjoy it.🤗😉
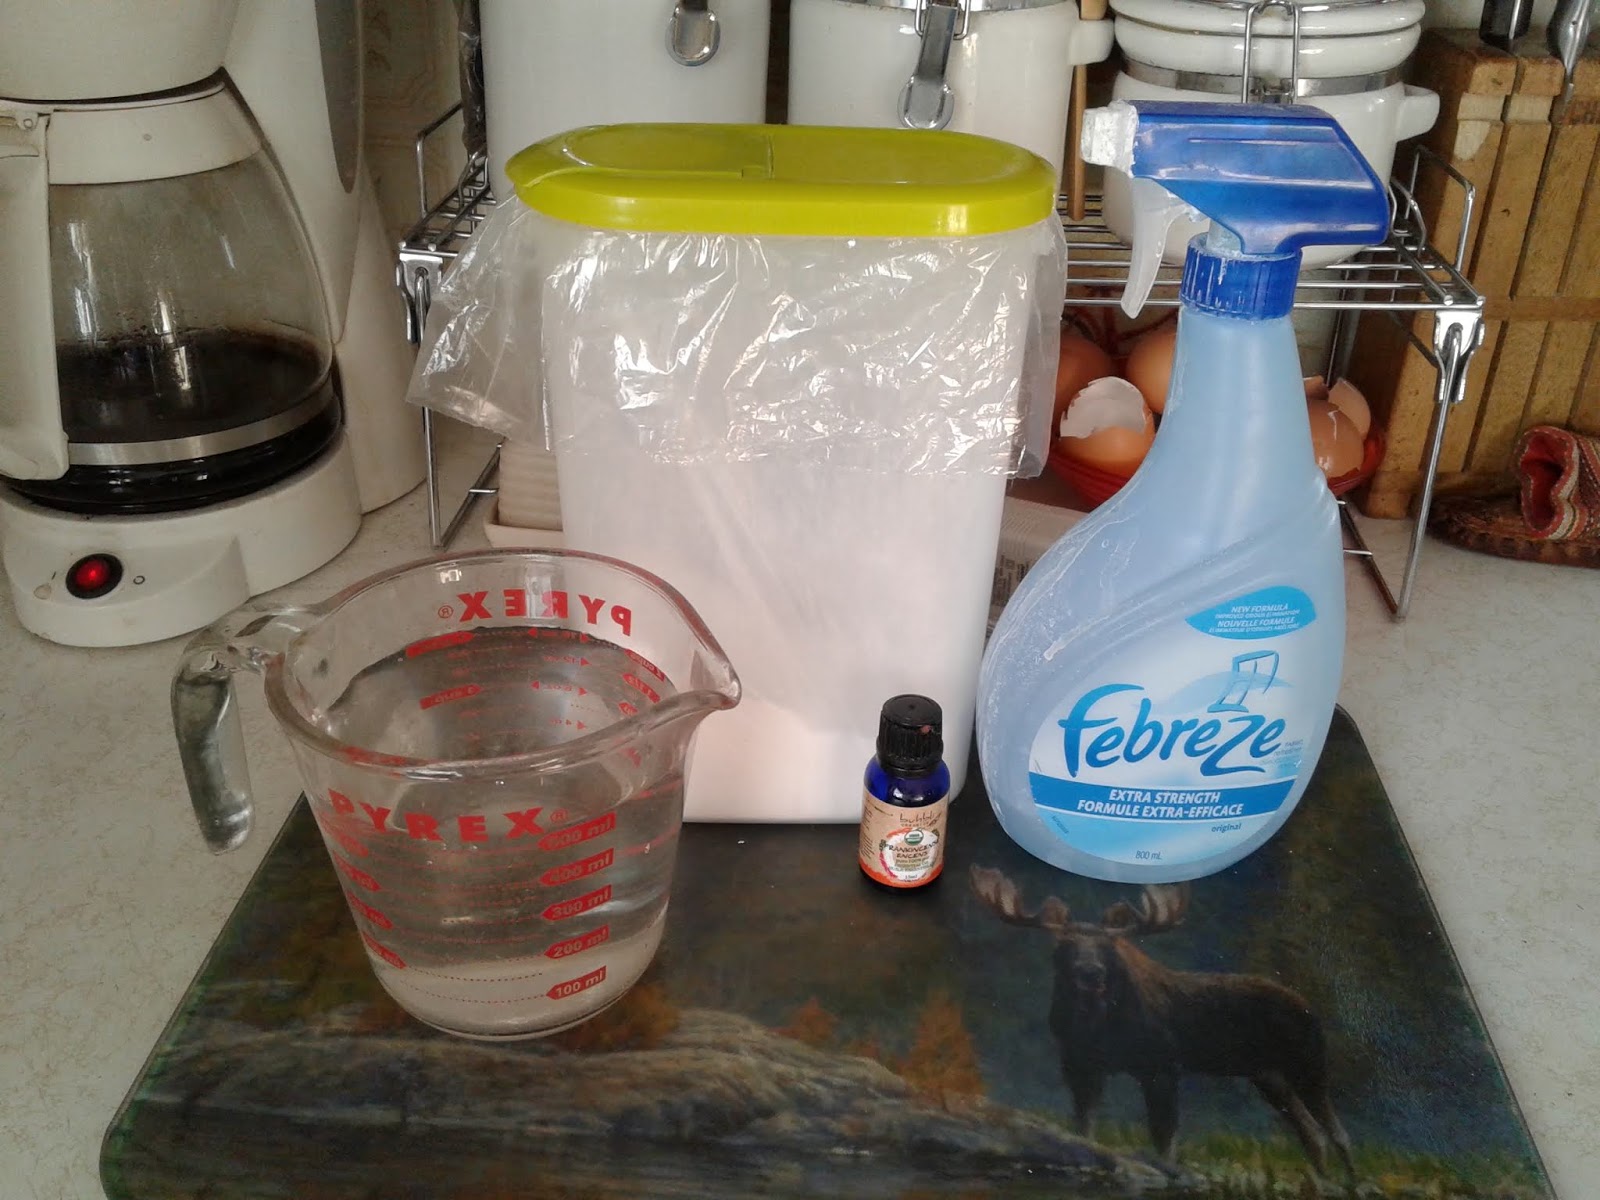
Hello and good morning. Welcome to Its A Mom Life, if your new make sure you go ahead and hit that follow button for all the fun. What A great Tuesday, the weather is warming up and my window is opening more and more. That fresh air is wonderful, puts a little hope into my day. Do you look forward to opening that window? There is nothing better then a fresh smelling house, unfortunately with kids the house sometimes has kid smells in it lol. Air freshener can smell very thick, and it can add up with how much you need to use! Then you have all the added chemicals that are put into that bottle. There is an awesome diy recipe for homemade fabreeze that I would love to share! I have been using this kind for a long time now, it’s quick and easy to make, and is much cheaper. I will share the link that I had originally followed, mine is different now. As for how I make mine all you will need is :
an empty spray bottle (I have a very old needing to be replaced old fabreeze bottle),
baking soda
essential oils
water
Just mix in bottle Spray on any area furniture, curtain, just the air well you get the idea! That is how quick and easy it is. Go ahead give it a try or try the one linked below, let me know what you think in the comments down below. Till next week happy diy-ing, I think you will love this one!
Hello and good morning, happy Tuesday. Great day for an awesome day for another diy product. One I think you’re really going to enjoy! As I am in love with this one! Isn’t it crazy how much everything costs these days? I am always shocked when I walk into a store to grab something and then find myself standing there for what feels like forever trying to decide whether I really need that item now or not, after seeing the price tag on it! I find that materialistic items can be the worst! Do you agree? Cosmetics and feel good products are insane! After spending I don’t know how much on makeup and face care, I knew there had to be a better way. So hopping on Pinterest where I go for almost everything haha I decided to try makeup remover as I enjoy having the wipes for vs the bottle of liqiud, but not wanting to spend the money they wanted, I gave it a try! I will say this, I am not going back! These wipes cost very little, are so easy to make and work fantastic. It can even get waterproof mascara off! So if you are looking for a better way to get ready for bed and get all the day off, give these a try. Don’t forget to leave a comment and tell me what you think! For these wipes they take much less time to make then going into the store to get them! What you will need is:
coconut oil
baby wash
warm water
paper towel cut into squares.
I start with 1 cup of water as I only make about 50 makeup wipes at once, I don’t wear makeup everyday so these last me a while. Also they don’t dry out! In a bowl, or jar add 2 tablespoons of coconut oil and 1 tablespoon of baby wash. Add warm water and mix till combined. Soak your paper towel squares in solution. They should not be dripping wet, ring out any extra water. Then just store them in a air tight container or I use a zip lock bag! That is it and all. Give them a try let me know in the comments down below. Like this diy and want more like this let me know. Go ahead and hit that follow button to catch all the fun here on It’s A Mom Life. Till next Tuesday have fun making something new, to save money and enjoy the gentleness of less chemicals.