Hello! Good morning and welcome to Its A Mom Life, happy Friday.
I’m always happy when Friday rolls around, it’s the weekend time. Kids don’t have to be up for school, movie night and I can have an extra cup of coffee before starting breakfast and morning routines.
However with that said I live in Saskatchewan and it’s still winter, for another like 12 days then it’s spring (according to the calender)!! With it being cold and snowy out it makes it hard to have the kid’s go and do stuff. This is especially with the 2 younger ones being 2 months old and 2 years. Winters get hard when we are stuck in the house for so long. My kids still go out in the winter don’t get me wrong however it gets hard. My son is always ready to go out did where as my daughter you have to make her at times. Do you remember no matter what being outside each day? Whether it was just walking to and from school,or meeting up with your friends somewhere? It’s different these days!
We live in a small community and so its a little different not as much worries for some of the dangers that are out there these days. I can’t imagine what the city life is like for kids these days, I grew up in a city and it was something “back in the day,” I can just imagine the scaryness of today’s world.
No wonder kids are in the house playing video games all day. As a kid we knew the rules, and for the most part we followed them. Not all of coarse but that was also before parents would find out everything from social media! We did crazy stuff and would get hurt or learn from our friends getting hurt!
However we didn’t eat toxic stuff as a challenge because we were board and the internet showed us! We didn’t walk into traffic because we were taking a selfie or catching a Pokemon!
Our parents had their rules and that was that you got into trouble and you got grounded. Actually grounded to not how kids are “grounded” now.
I find it can be hard to have the kid’s want to go outside, the imagination and determination is not what it used to be! Kids don’t just go and play, they need to go and play in a house. If it’s that cold hang out at home, build a fort to stay warm, there is just so many distractions of the world that stops kids from being kids!
Us as parents can make it hard also tho, with all the crazy stuff popping up in the world, all you want is to make sure they are safe, keep them under your wing, and help them fly. How can they fly if not taught and then encouraged to try.
Yap days are not what they use to be and we need to find that balance in life. How do you get your kids to play outside in the winter? Do you have problems getting them outside in the summer?
We are always outside in the summer, which i think might make it seem harder in the winter also tho! What do you think, should kids be required to be outside each day, what are the limits of where they can go!
My kids are told not to be on the other side of town( not a big town), however they get told not to pass main street, stay together, don’t go to others peoples houses if not telling me! I find these basic rules! What is your thought?
Let me know in the comments down below your thoughts on kids and society rules for 2019?
Things sure have changed these days, how do you find balance in letting them be kids, and not being just well silly?
Let’s work together to find balance in getting our kids out there and being kids again! Like this blog let me know if you want more topics like this one.
Don’t forget to hit that follow button for up coming blogs.
Till next time happy Friday, have a great weekend, and let’s hope for warmer weather so we can all bust out of the houses, and spend time with our families outside, where we should be!!
Category: Uncategorized
Oh My Waffles!
Hello and welcome to Its A Mom Life. Happy Thursday which means it’s a recipe blog! A good day for one I think with the weekend coming up!
This recipe is for Waffles, they are super yummy I might point out. We usually try to aim for waffles or pancakes on Saturday morning, as this usually leans towards waffles tho. Do you have a go to Sautday morning breakfast in your house?
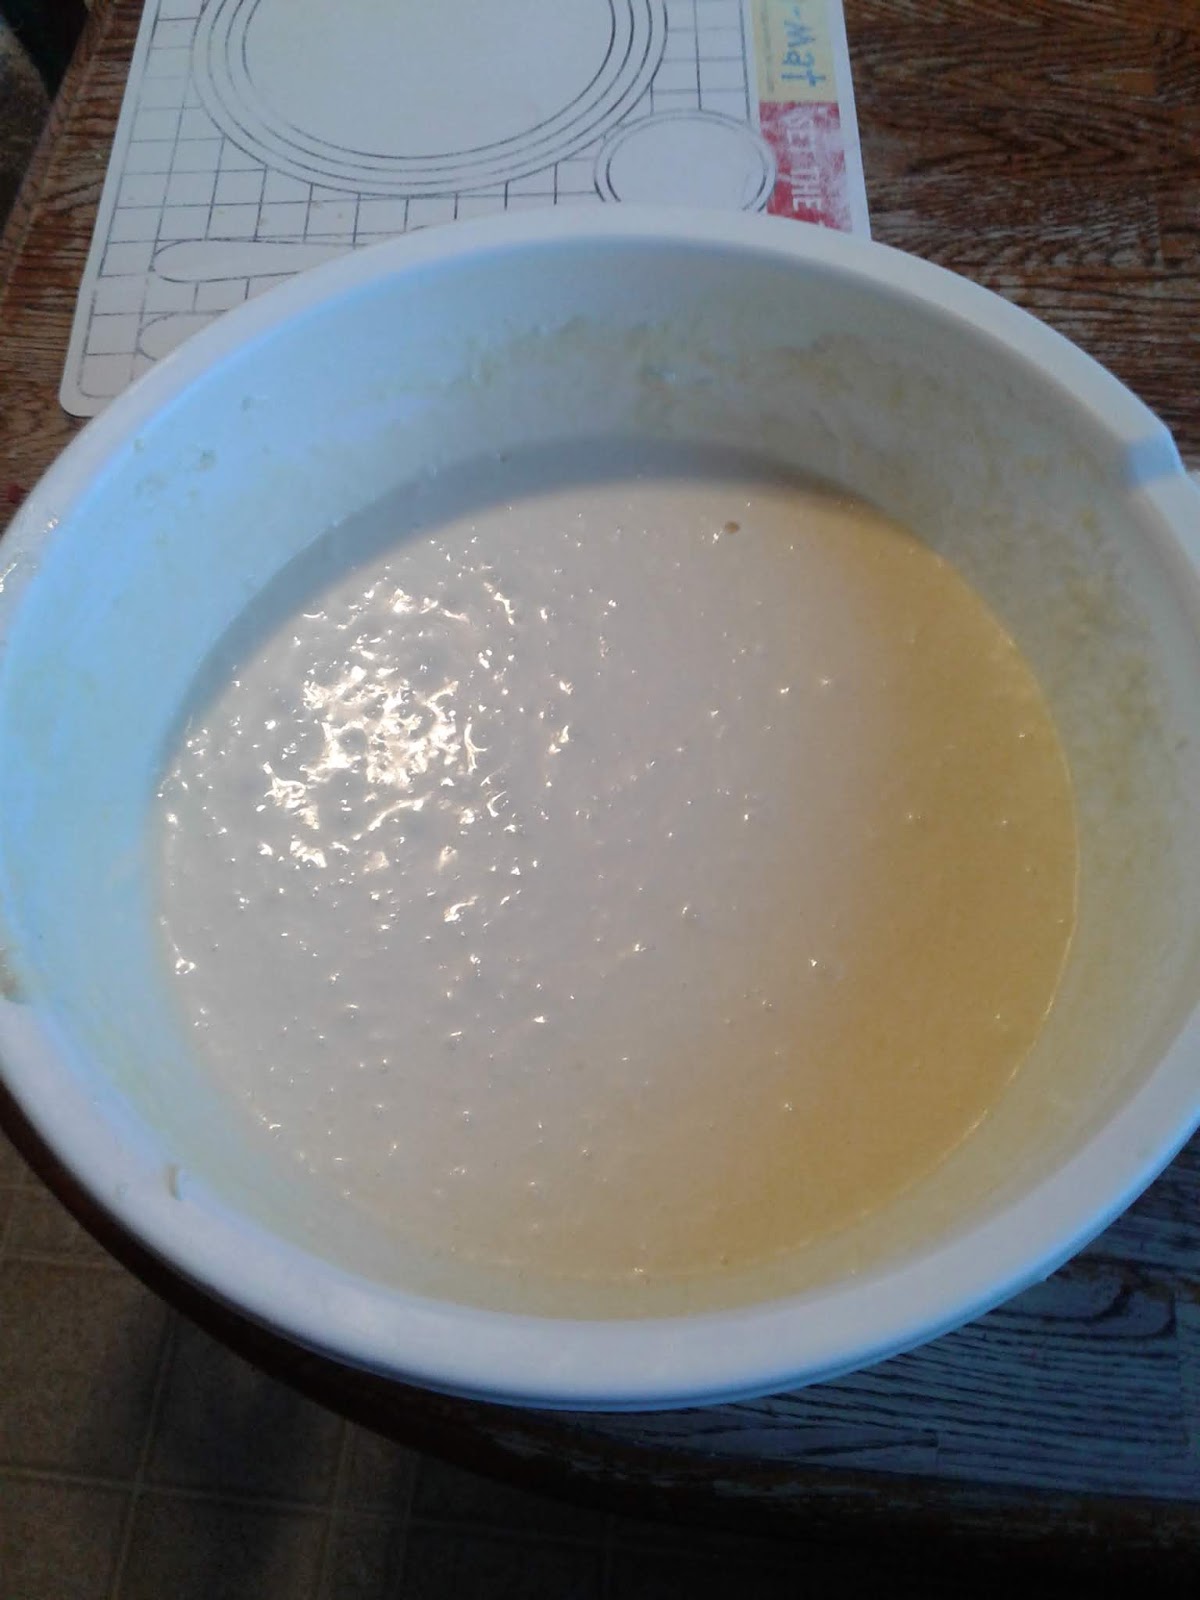
These are easy to make and the batter can be prepped the night before and stored in the fridge!
For this yummy waffle batter you will need:
- 1 1/2 cup flour
- 1 1/2 teaspoon baking powder
- 1/2 teaspoon baking soda
- 1/2 cup of butter (melted)
- 1 1/2 cups buttermilk
- 1 egg
In a bowl combine flour, baking soda and powder then mix the liquids in the milk, butter and eggs slightly beaten mix with the flour mix.
Mix until combined it may be lumpy. I find a wisk works well for getting it mixed good.
Let the batter sit for about 5 minutes Heat your waffle iron, I usually let mine what up for 5 minutes which is perfect while letting the batter set!
Then just cook in waffle maker usually about 5 minutes each.
This makes about 4-5 waffles, they also freeze great, this makes a great freezer breakfast!
I almost always make a double batch, then I just go up from there depending on how much I want in the freezer!
Give them a try let me know what you think?
What are some fun weekend breakfast ideas, leave them below!
Make sure you hit that follow button for up coming recipe blogs!
Until next blog happy cooking!


So Much Cooking Tho!
Hello and welcome to Its A Mom Life. Happy Wednesday, it’s moms Tips and Tricks blog!!
Who doesn’t love reading, learning and sharing new tips for so you have more time, for the stuff we would actually like to do?
Do you ever dread suppers? The thought of thinking and having to cook about another meal?
Days can blur together, and suppers can become tirering and boring. Any meal takes time and thought, now do that 3 times a day, 7 days a week 365 days a year.
That’s a lot of meals, that’s actually 1,095 meals a year! Yap that’s a lot, no wonder we don’t want to cook everyday!
Even just talking suppers that’s still 365 suppers to prep and cook everyday. Why do we do so much?
So many reasons it’s better for us, it saves more, it makes us think we look better to others!
This tips and tricks blog is plan a head and make that 365 suppers not as bad! Sounds good right?
I’m not just talking about meal planning your week’s I am talking plan those lazy or no cook nights!
Make a giant pot to last 3 days, use leftovers, go a head make a slap together supper, it’s fine everyone will be just fine. Got it in the budget grab take out, don’t feel bad about it. There is plenty of nights to make super healthy homemade suppers. There will always be another night.
So that is what my moms Tips and Tricks blog is for this Wednesday, make all those meals work for you. Don’t always worry about healthy, fancy, and perfectly balanced. Take the time and the help when you can. This is something that can be harder to do and accept then making the meal but, in the long run it will be better.
Till next week’s blog happy cooking, or not cooking. Take that extra time off and relax doing what is going to make you happy, and want to set out to cook again.
Let me know do you cook everyday? Take a night off what did you do with that time? Comment below I would love to know!
Want more tips and tricks like this?
Leave your tips and tricks comments down below also.
Don’t forget to hit that follow button for more blogs here on It’s A Mom Life.
Hope to have you join in the fun!

Homemade Make Up Remover Wipes
Hello and good morning, happy Tuesday. Great day for an awesome day for another diy product. One I think you’re really going to enjoy! As I am in love with this one! Isn’t it crazy how much everything costs these days? I am always shocked when I walk into a store to grab something and then find myself standing there for what feels like forever trying to decide whether I really need that item now or not, after seeing the price tag on it! I find that materialistic items can be the worst!
Do you agree? Cosmetics and feel good products are insane! After spending I don’t know how much on makeup and face care, I knew there had to be a better way.
So hopping on Pinterest where I go for almost everything haha I decided to try makeup remover as I enjoy having the wipes for vs the bottle of liqiud, but not wanting to spend the money they wanted, I gave it a try! I will say this, I am not going back!
These wipes cost very little, are so easy to make and work fantastic.
It can even get waterproof mascara off! So if you are looking for a better way to get ready for bed and get all the day off, give these a try. Don’t forget to leave a comment and tell me what you think!
For these wipes they take much less time to make then going into the store to get them!
What you will need is:
- coconut oil
- baby wash
- warm water
- paper towel cut into squares.
I start with 1 cup of water as I only make about 50 makeup wipes at once, I don’t wear makeup everyday so these last me a while.
Also they don’t dry out!
In a bowl, or jar add 2 tablespoons of coconut oil and 1 tablespoon of baby wash.
Add warm water and mix till combined.
Soak your paper towel squares in solution. They should not be dripping wet, ring out any extra water.
Then just store them in a air tight container or I use a zip lock bag!
That is it and all. Give them a try let me know in the comments down below.
Like this diy and want more like this let me know.
Go ahead and hit that follow button to catch all the fun here on It’s A Mom Life.
Till next Tuesday have fun making something new, to save money and enjoy the gentleness of less chemicals.
I had a shower and one still took all that off!😨

March Find The Gold!
Hello and welcome to Its A Mom Life.
Its a new month, and almost spring. Time for a new challange.
This challenge is a little like a lady that I follow Cass from clutterbug, she has a hug your home challenge that I will leave a link for down below. Go ahead and check her out for lots of organizing motivation.
However for this blog I would like to start a new March challenge. So here we go.
To find the gold, you must find the pot! To find the pot, you must find the rainbow! To find the rainbow you must look.
Sounds a bit like decluttering the house. Sounds like my house anyways. As 2019 is here, I had my last baby, it is time to find space in my little house. With March here ad the weather warming up in Saskatchewan, I thought what a good time to get some stuff gone through and out of the house!
So, my challenge is to pick one or two rooms a week and clean and declutter. I am aiming for 2 rooms as I already kinda started this challenge. I am excited about this challenge as I am now in a time where i can regather all the stuff that has been placed here and there, and reorganize it.
Finding that one spot or home for many items that got put somewhere while more or of if is located in another spot. No more “oh it can go here for now.”
My March challenge is to get one bag or box from each room of garbage and one for donate or sell.
So if you’re game, let’s get out our boxes and bags out. Get a game plan are you working from room to room, or category by category.
I got a lot done by doing random old paper work. Still need to finish that big project when it’s all gathered.
So get your starting point ready. Ready, Set, go declutter.
I will see you next Monday for more organizing fun. I hope this motivates you to get rid of some clutter, also I hope to show you some of my progress as I hope to hear about some of yours next week.
Till next week have fun getting some of your space back, and maybe making a little money on stuff youn don’t need any more.
Till next week have fun decluttering rooms and filling those boxes and bags.
Let me know how your decluttering plan in the comments down below! Do you declteer many times in a year? Declutter only when you have to?
Don’t forget to hit that follow button for all the upcoming blogs and challenges and motivation coming on It’s A Mom Life!
Link:
Clutterbug
https://youtu.be/F4rcZgXAeKk
Hello In There!
Hello and good morning welcome to Its A Mom Life, it’s Sunday fun day! What better day to talk about organizing and what better thing to start organizing before spring then the freezer! 😨
Do you know what is in the back,or the very bottom of that ice box? How often do you get into it? Do you make it to the bottom, or the back? It can be a scary thing in that dark space!
There is a lot of time I have no clue what, or how much I have in there. It can get frustrating when it comes to the months that I am trying to stretch my groceries. The months like this is when on love my freezer inventory, however you must keep up on it, which can be hard when you are in and out of it daily.
With that it can be nice to have it organized to be able to see everything and/or have it categorized so you can find stuff easier! With that said for this organizing blog I would like to share some easy inexpensive ways to keep it a little more organized! The bins used are all from the dollar tree!
So if your ready grab a sweater and some gloves and let’s dive into the freezer!
I have a stand up freezer and a little apartment size. I will show you how I organize the bigger one… the standing freezer! I will show this one and organizing, as my little one is organized by categories, so it has bags of peeled sliced apples, and peaches from the summer. Some extra baking snacks for the kid’s and just a couple baged veggies from the garden that can’t be flattened as well!
So back to the big one. On each shelf I try to have the same category items to a degree, as other stuff will get where it fits but can be recognized by the outside packaging. You will see what I mean.
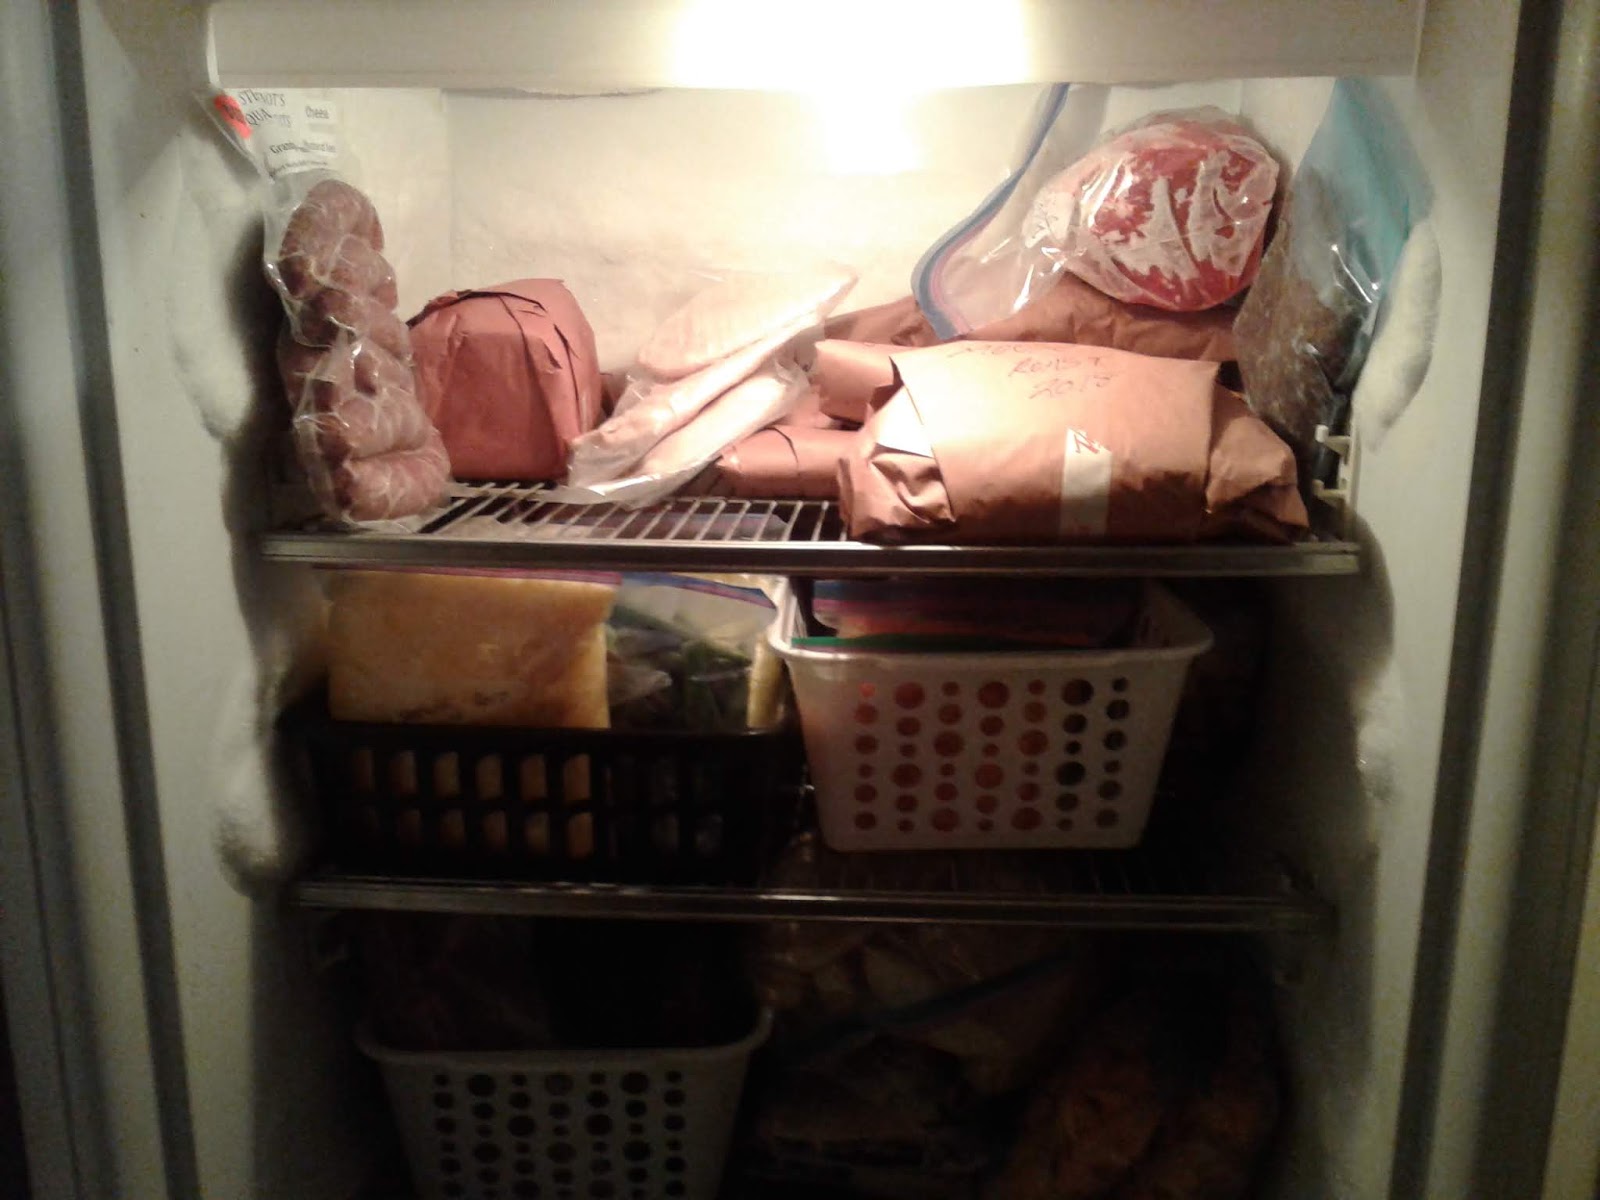
The top shelf I have for some meat the bigger meats, and any other meats that are not steaks and ground beef. They have bins they go in. This is pork, chicken, but there is also wild meat but in one spot, as we try to not use it on daily bases and our roasts as they take more space. I also put some larger pans of freezer meals here.
The second shelf I have bagged veggies from the summer in bins. This way bags don’t get pushed to the back and covered in snow build up.
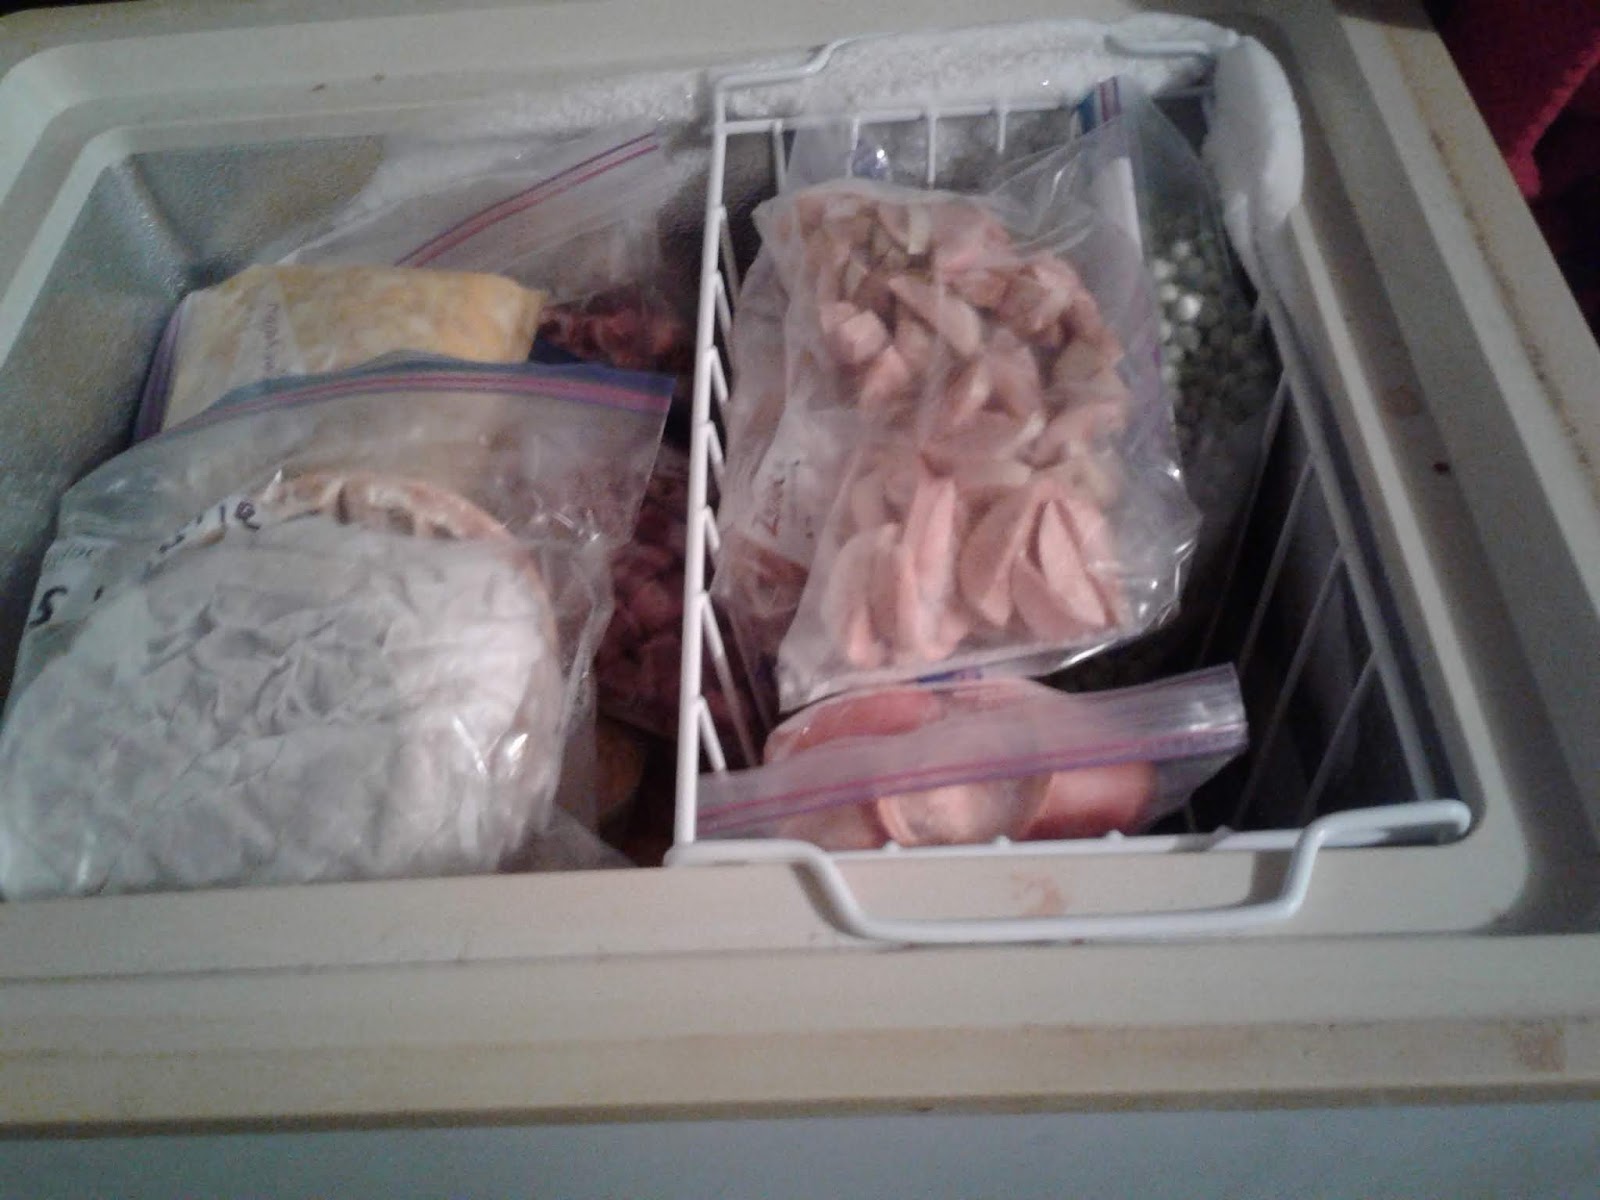
Then we go to the third shelf this has the small bags of fruit in one side in a bin, and larger bags of fruit on the side. This also has some bags of pre made foods here also.
The last wire shelf has a bins, this is one for ground beef and one for steaks, this also is set up where the steak cuts are in the same row in the bin, so grabbing them can be easier and I don’t have to look at each package. As they are in “piles”.
Then the bottom, there can be a lot of room here but, having the stuff stay and not fall on your toes when you open the door is the problem.
With this I have some cabbage rolls in the back, they fit nice and can stacked up. Then in front in have a simple lid organizer from the dollar store. This holds flattened bags perfect they can be in a row but not fall. This I have pumkin and shredded carrots.
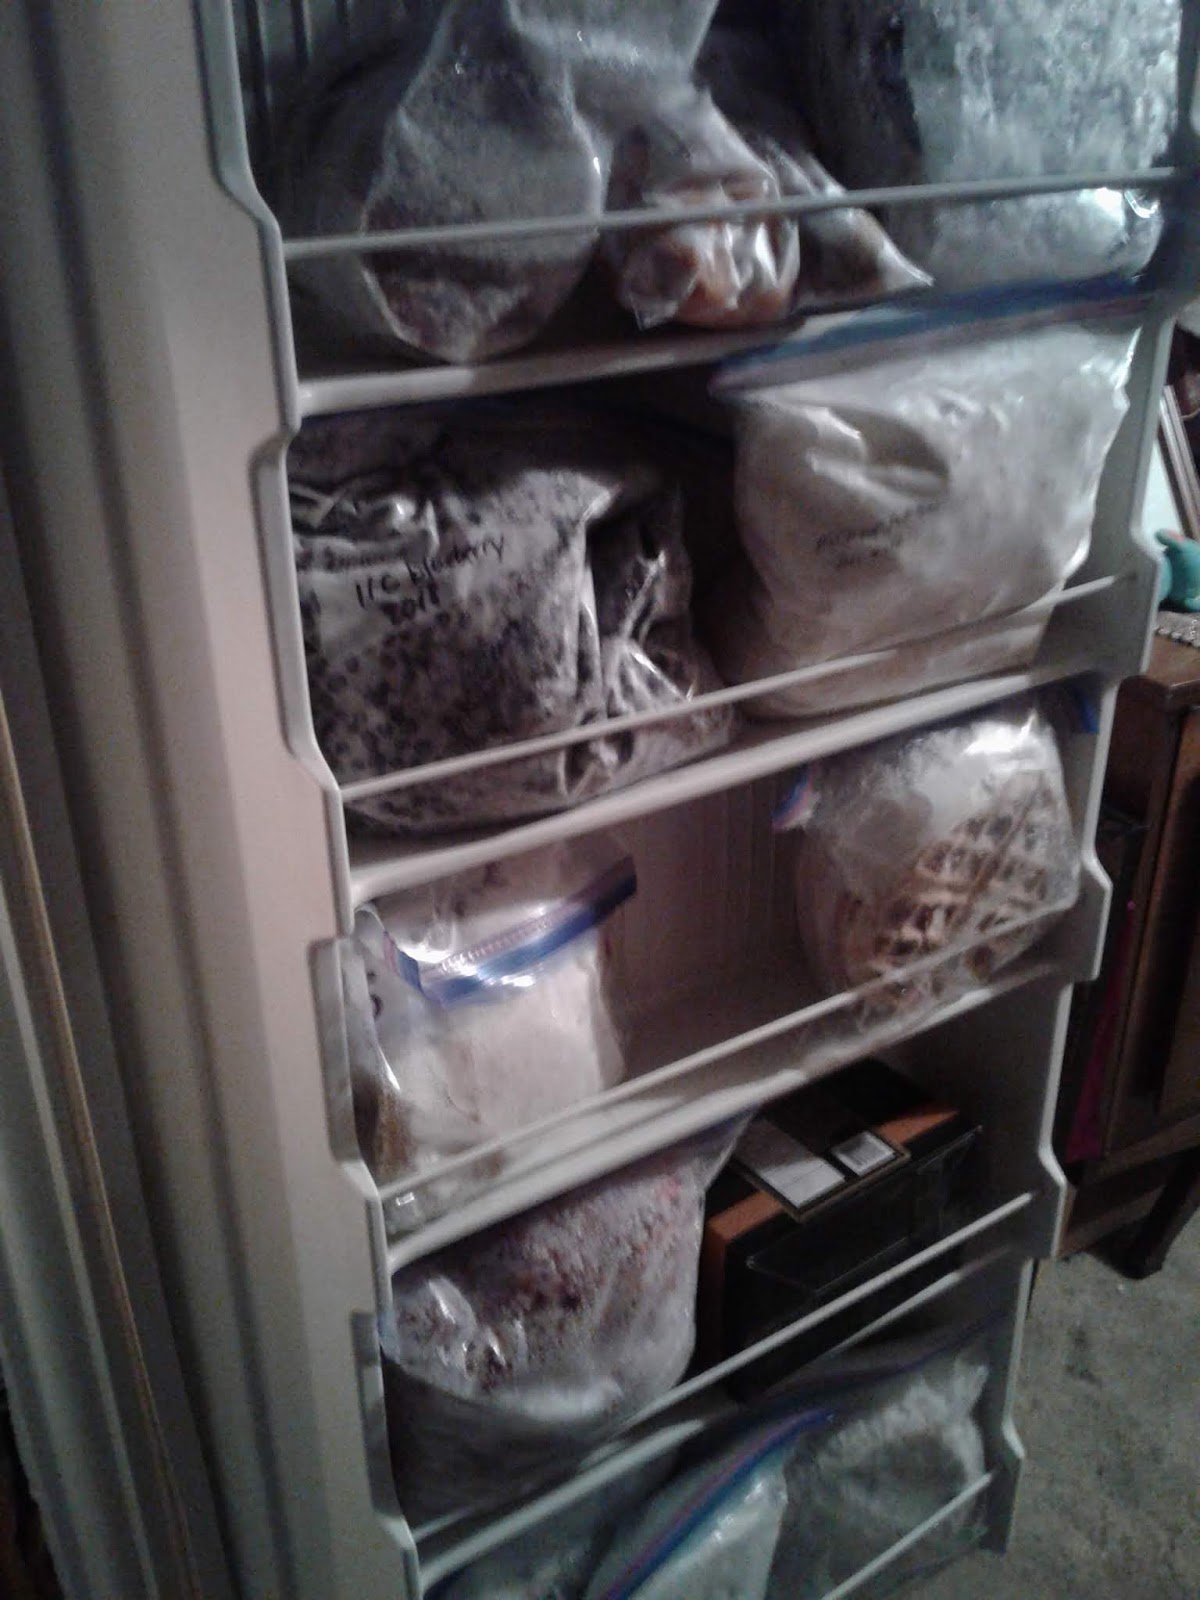
There is some containers of premade cookie dough from a fundraiser. I usually have cookie dough logs I pre make, and fit nicely in the door instead! Then the door I typically put the waffles, and pancakes, dessert breads, and i have some large bags of blueberries and Saskatoon! 😁
So that is my stand up freezer, I look forward to organizing it more, with the upcoming blog challange hit that follow button to make sure to catch it, and join in! Till next Sunday, try thinking of how to make your freezer more handy. Let me know how you organize your freezer? A little can go a long way!
Top shelf is meats!
The vegetable bins

The third is fruit and vegetables with extra big bags and some premade food!

The last shelf has ground beef in one bin and steak cuts in the other!
Also on the bottom the rows sitting up and down are in a lid holder, with a nice stack of shredded zucchini on the side.

The door holds waffles, and dessert breads with some large bags of berries. This is where the cookie log dough would be but I’m out!
This is just a glance in my small one has it’s just extra large bags of fruit ON the bottom, and some used bags and a little extra large veggies like tomatoes and some extra baking on the top!
But… Everyone Else Has One!!
Good morning, welcome to Its A Mom Life if you’re new. Welcome back if you’re a follower. It’s Friday which means it’s time for another mom talk!
This mom talk is about kids and technology! I want to know do your kids have cell phone’s or tablets? How old were they when they got it? What kind do you start with? How many divices do they need? Do they pay you, how do they pay for it and the bill? I ask these questions because my kid’s keep asking for a phone, or some sort of divice as there is so much out there!
So let’s start with what to get them! There is so much out there and kids want it all. My 2 older kid’s ask the most for a phone, as I would lean more on a better tablet game device.
A phone I need to monitor calls, texting and data. A different game unit I don’t. There is still the matter of paying for the games tho!
Then there is still the matter of monthly payments, for a phone anyways, the other would be different perhaps.
So, I ask them how are you paying for it? They have an answer of either I didn’t know you have to pay, or well can’t you? Hahaha is my answer!! I tell them they need to be old enough for a job, to pay. Can’t they do chores, and I pay? Yes,but I told them I dont count there couple daily chores! They then complain I won’t “let” them get a job!😒 Let me take this moment to point out they are 10 and 8 years old!
I didn’t have a phone till I had a job and worked to get that money to pay for it. How about you, when did you get your first phone? I highly doubt it was just handed to you!
I understand safety reasons for some, however we live in a small town, I don’t believe they need one for safety reasons. How about to contact them about where they are, I’m the mom that tells them they come home after school, ask then go! So they lost that argument also.
That’s another thing, the kid’s these days loose them, and what, just get a new one! How does that work, I was brought up you lost something you found it or it was gone. The responsibility of the world these days I have found not to be the same! What do you think?
So, I’m not sure about my kids having all this technology? I would love your opinion on this matter! Should kids have phone’s or technology that will need to be monitored to keep them safe, from the crazy internet world?
What is a good age? How should they be shown responsibility for the bill, and just having one?
Let me know your opinion in the comments down below. From one mom to the next I am actually a little torn on this one, so thank you for your help on this topic.
What topics would you like to hear about in upcoming mom talks? Let’s take one topic at a time and help each other in this fast moving world.
Also don’t forget to hit that follow button for all the upcoming blogs here on It’s A Mom till next blog have a great day and an awesome week!

Supper Again? No Worries
Hello and good morning welcome to Its A Mom Life.
For this Thursday recipe blog I will be sharing a yummy and easy supper to make.
I had got this recipe off a vlog a while ago from a lady Kimmy from She’s In Her Apron, link will be below. I had never heard of it, and neither has lots, I am actually thinking it’s an American dish! Let me know if you have heard of it?
Supper is going to be Salisbury steak! This is a yummy,easy and fun supper. Everyone in our house likes it, and be made early and left on warm!
So here we go I will show you how to make it, give it a try let me know what you think!
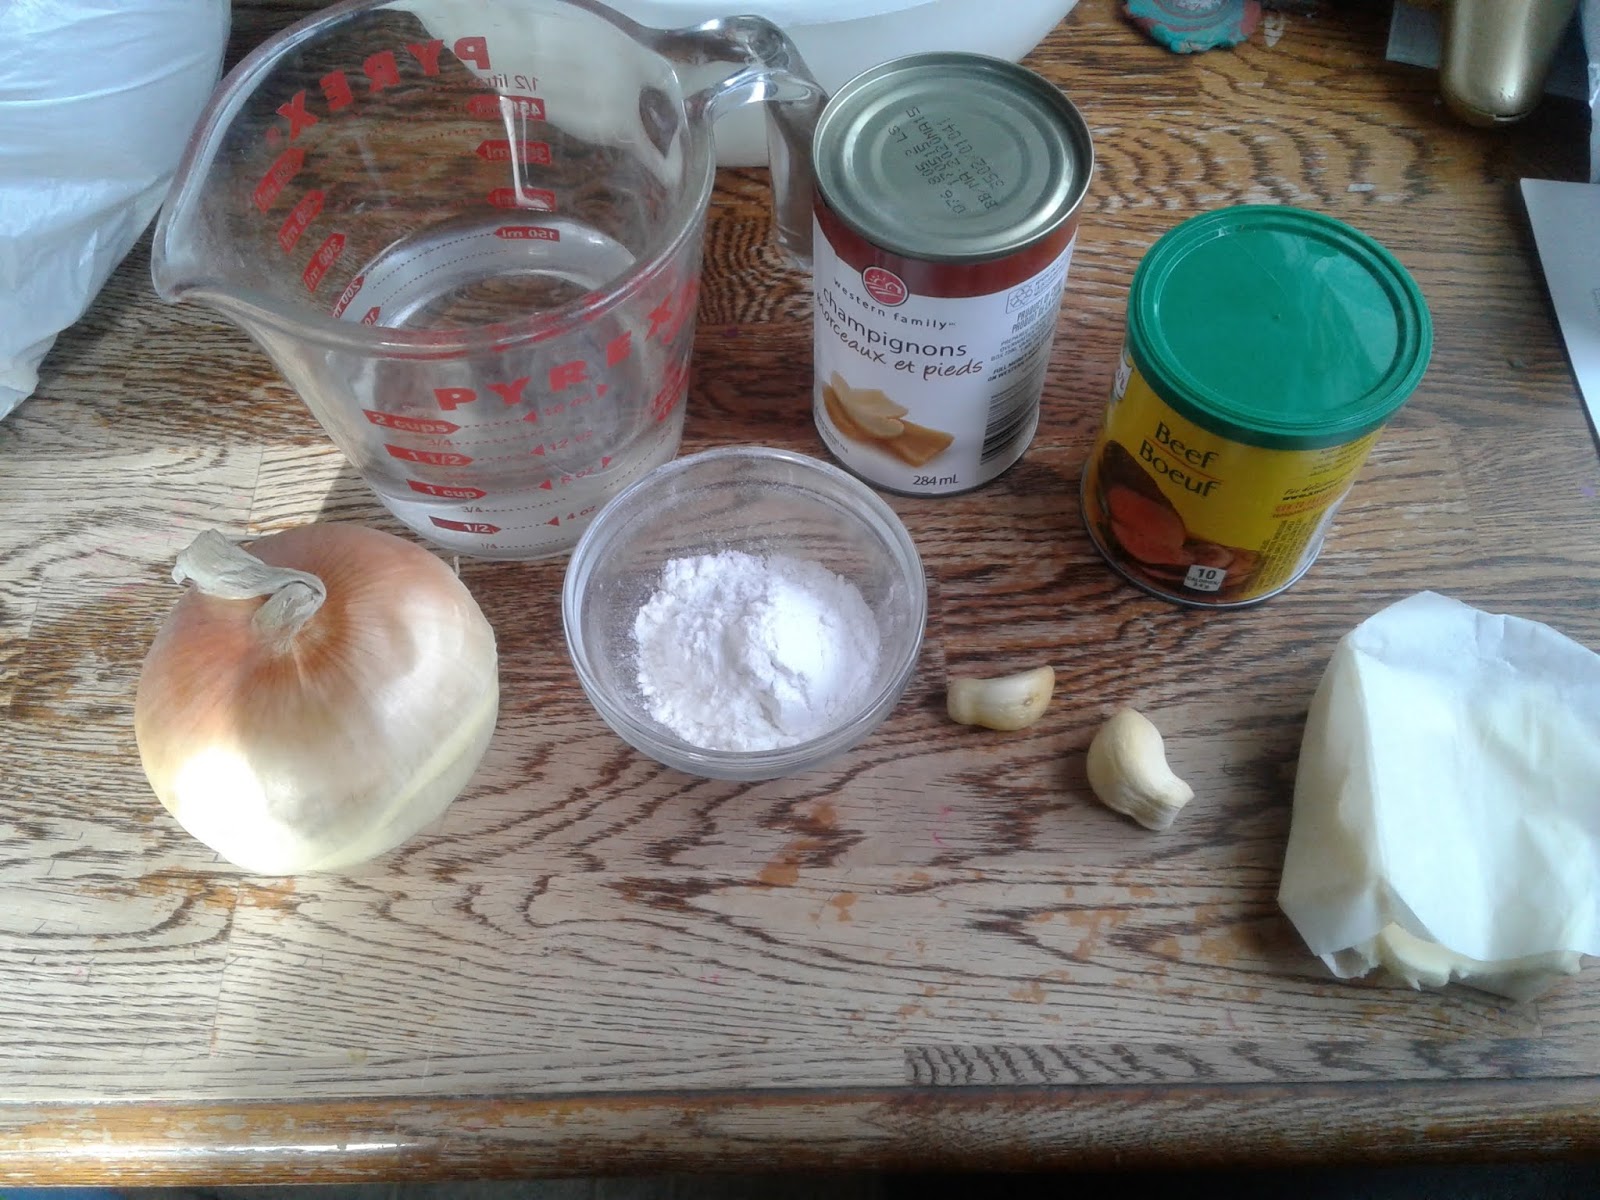
To make all you need is:
- 1 lb ground beef
- Mushrooms sliced or a can
- diced onion
- garlic
- 1/2 cup bread crumbs or rolled oats
- wasceshire sauce
- 1 egg,
- 1 cup water or beef broth
- 2 tablespoons flour
- 2 teaspoons mustard (optional)
- 2 teaspoons of butter.
So now to make it happen!
For the hamburger steak: combine ground beef, onion, garlic,egg and wasceshire sauce. Mix well and make into patties.
Fry them on both sides till cooked about 10 minutes a side depending on size of patties.
For the sauce melt butter in pan add mushrooms and onion and fry about 4 minutes then add your beef broth, flour and mustard whisk until thickened.
Add patties to sauce put on simmer and cover until ready to serve!
That is all there is to these easy yummy Salisbury steak. Serve it with come mashed potatoes we did homemade air fries with some steamed veggies!
Give it a try, let me know what you think of them in the comments down below.
Have you had these before?
What would you like out of the recipe blog here on It’s A Mom Life?
Don’t forget to hit that follow button for all the upcoming blogs here on It’s A Mom Life.
Till next blog have a great day and a yummy Supper!


Link for Pinterest recipe:
https://pin.it/jhcxnpdkpz36ms
Link for you tube video She’s In Her Apron:
https://youtu.be/0Al03C-nYtA
Reuse And Grow A Great Garden!!
Hello, and good morning. Welcome to Its A Mom Life, happy Wednesday. This is a great day for a mom tips and tricks blog!
Do you plant a garden? What do you grow? Last is when do you start your seeds, if you do start your own?
I use to pre buy all my plants that I could not just plant in the ground. That was before tho and after spending so much money as I have a large garden, years ago I set out to start trying to replant some of my own plants. I still buy some from the green house, and try to always get some flowers and plants need to support our loyal greenhouses. As I am from a small town I try to get a little bit from both greenhouses! So what’s some tricks that I use when starting seeds?
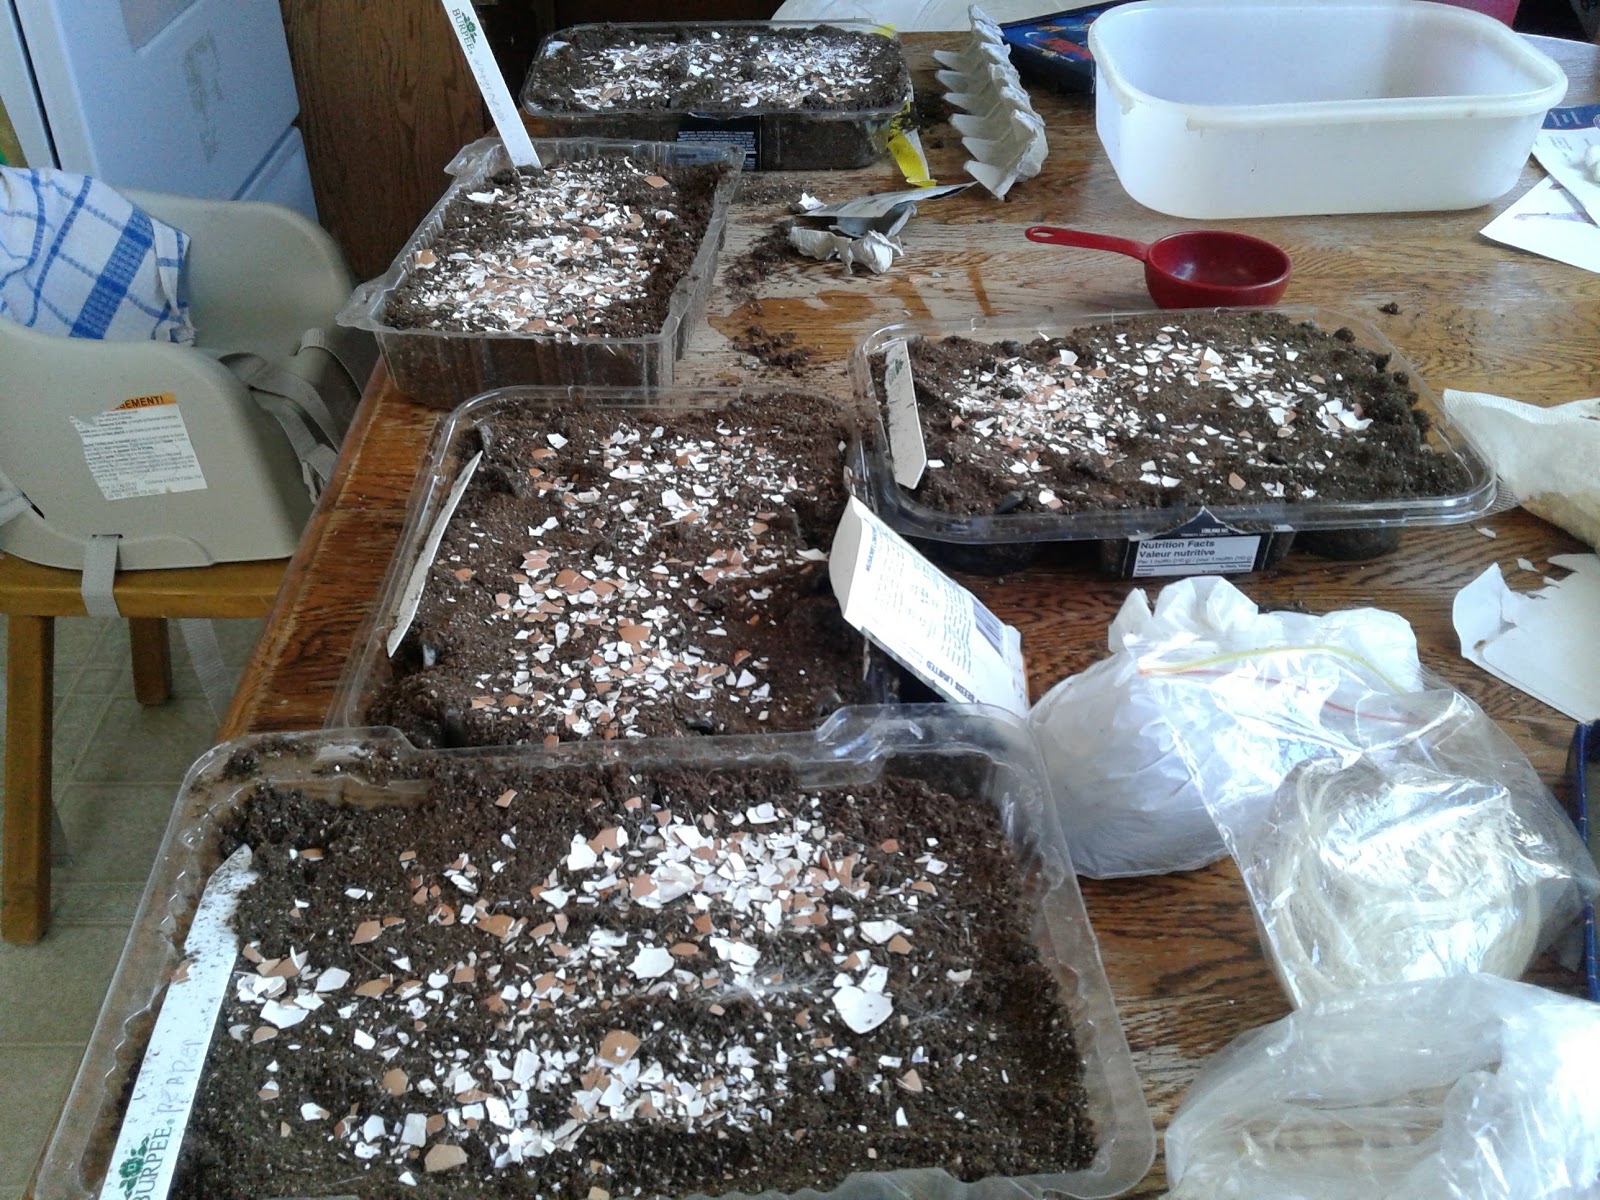
I have started some seeds already it was the end of February and I do try to start them earlier then that,but life happened and it was the end of the month! Story of my life there haha.
There are so many different products put there to start your own seeds, however all that stuff adds up very fast.
So I would love to share what I use that works just as great!😁 To start the seeds it can be easier to have something not to big to start those little seeds in.
For this I absolutely love individual yogurt containers, these are great to ensure that you get one strong plant to transfer and grow up big and strong. However I don’t usually have these as I don’t buy individual yogurts for in this house, too many kids for that!
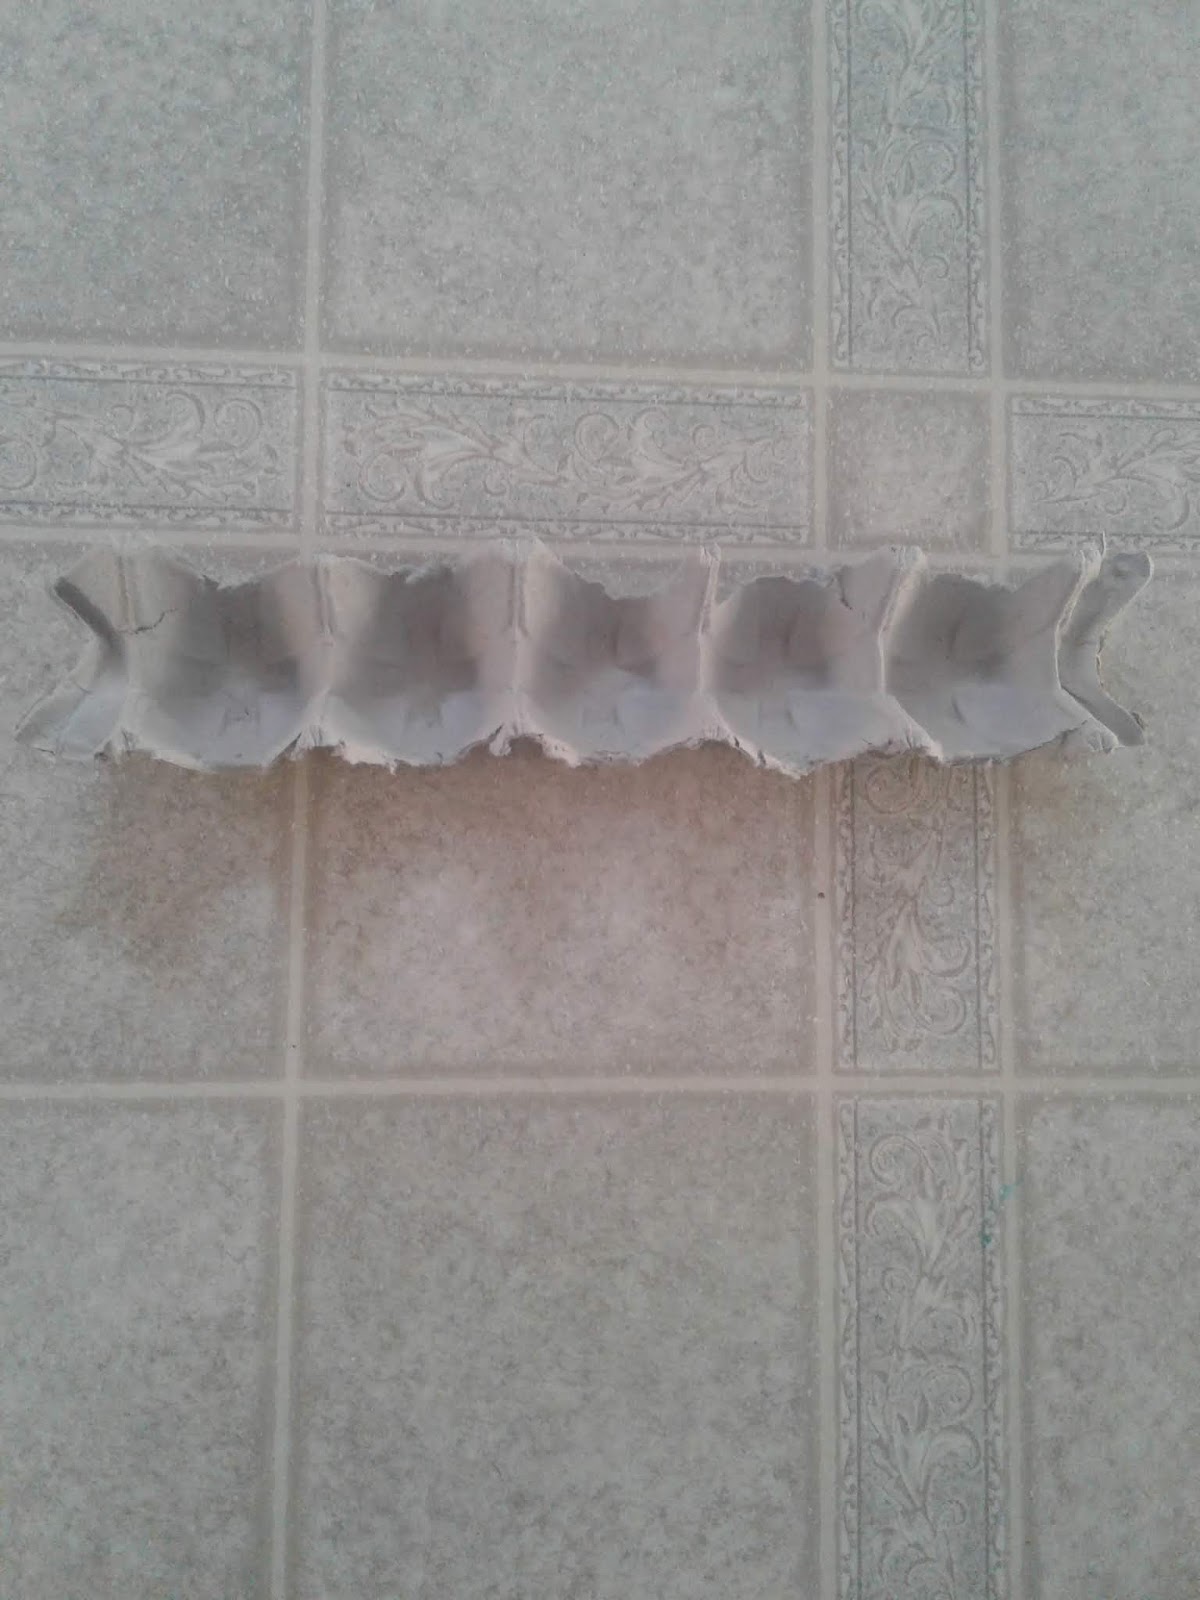
So, what do I use then? Egg cartons are what I go for! These are great to have one plant started in, with these they are also biodegradable also, so when transfering into bigger pots you can just put it all into the pot, and not worry about damaging the roots! Since these are not plastic and will leak water of course I then need something to hold them in.
For this I have some easy reusing ways of making little greenhouses for in my own house!
When you buy fruit in the winter those plastic containers that say grapes come in, don’t throw out, these make perfect little greenhouses. Got any of the large plastic containers that you get margerine in, yap those hold lots. You can also use plastic sheets that come with flowers to put on top to insulate it and make a great heated greenhouse for those little seeds. You can also fit rows of egg cartons in them so you don’t have to always pre cut into signal squares depending on what you are growing! This year I am trying to preplant some in small rows of cartons, to just put into the garden row, this way they will already be properly spaced for me also!😉
This is my mom tips and tricks for today! Let me know if you liked this gardening blog?
What tips and tricks would you like to hear and talk about next Wednesday?
I would love to know!
Till next week, have a great growing day!
As always don’t forget to hit that follow button for all the upcoming blogs here on It’s A Mom Life!!
Any carton just cut as desired!
I had the kid’s cut the egg cartons out!
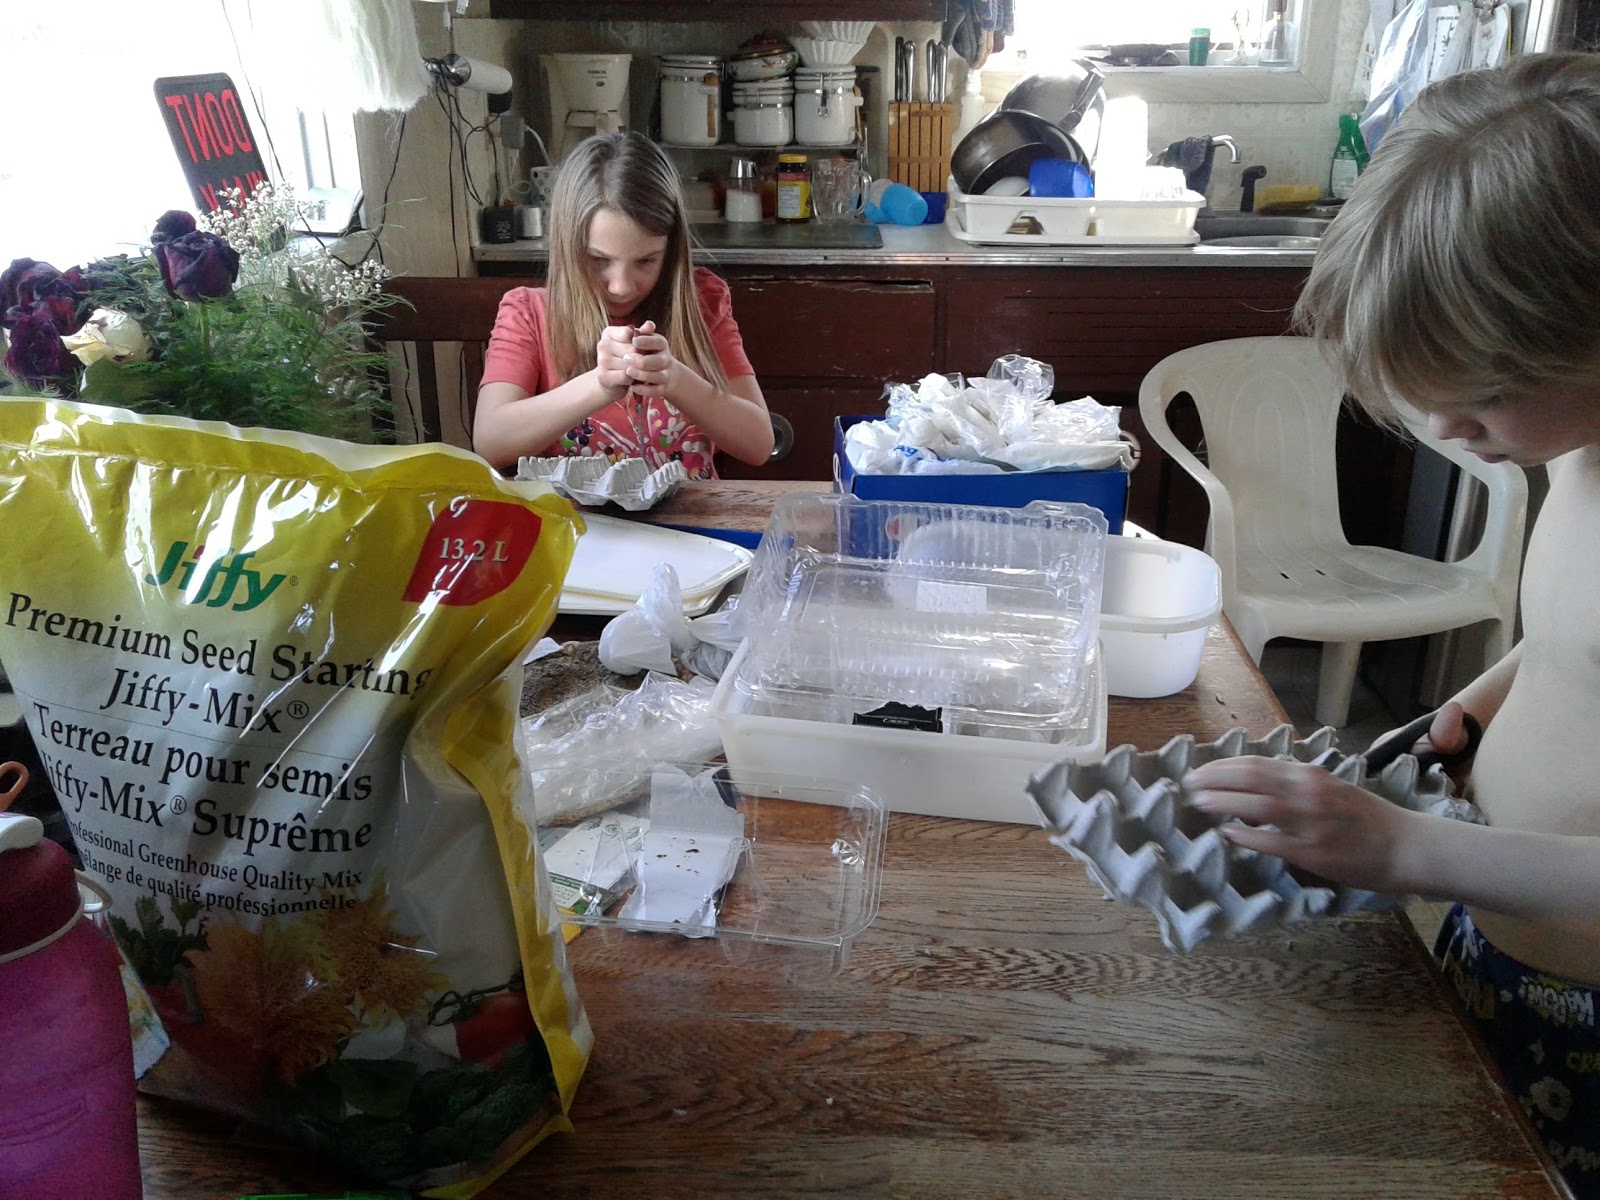
There is the store containers that I save through the year any plastic containers will do!
Your own FABRIC SOFTENER!!
Hello, good morning happy Tuesday. This diy Tuesday is a good one, I have been making this product for a long time now!
This is something that I found to work great, and save a LOT of money! This is making your own fabric softener!
This product is one of the easiest things I make and will not go back to store bought! This product contains ingredeints that you will more then likely have on hand and if not very cheap to get!
So if you’re ready let’s get to it!
For homemade fabric softener all you will need is:
- an empty jug ( I just have a very old fabric softener jug)
- 2 cups of conditioner any kind, I use the cheapest from Wal-Mart, you can use dollar store but for the size difference I use Wal-Mart!
- You will need 3 cups white vinegar.
- Last you need 6 cups warm water.
That is all you need!
So now let’s make it, take your 2 cups of conditioner and 3 cups white vinegar and mix together, pour into the jug, then just add the 6 cups water.
Give it a shake I try to shake it a little before each use also, before using it. That is all there is to it.
I will leave a link down below to the pin for Pinterest that I had used when I started this money saving product. This will save you so much and it works great.
The vinegar will also help with a little extra stain remover boost.
So, give it a try, let me know what you think of this fantastic homemade product in the comments down below.
I would love to know what other diy products you would like to try?
Until next diy Tuesday have a great day and don’t be scared try making something new to save that money this week, and of coarse don’t forget hit that follow button to follow all the blog topics here at ITS A Mom Life!

